Showing posts with label beans. Show all posts

Wednesday, September 26, 2018

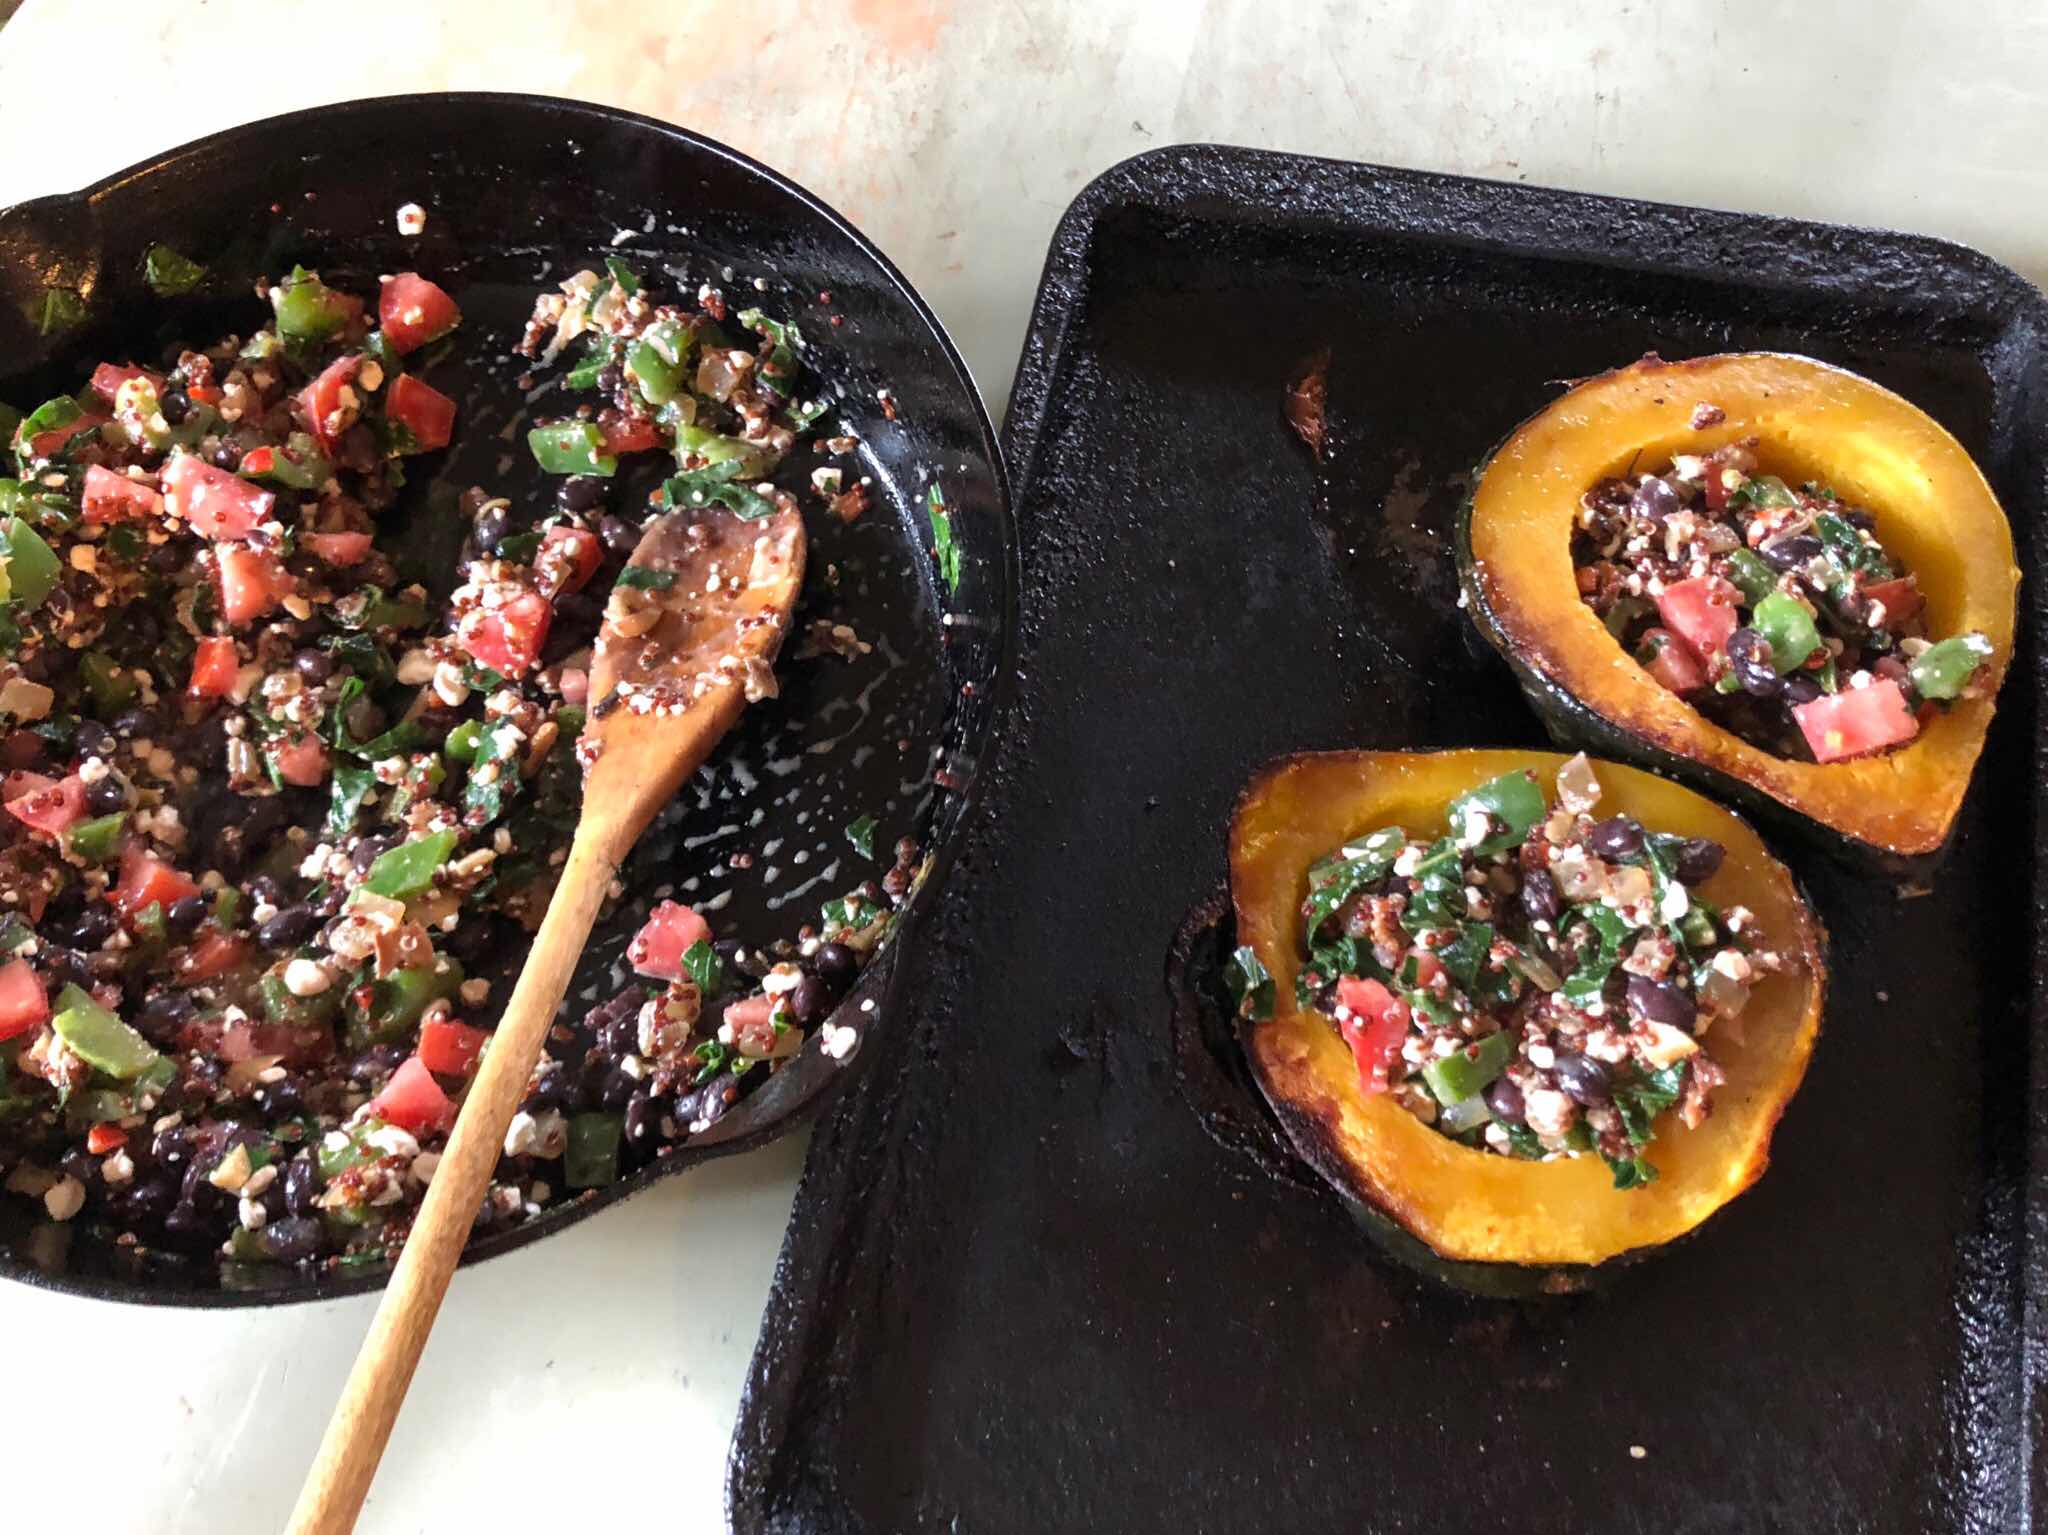
Stuffed acorn squash

Look, a recipe! This was a good way to eat an acorn squash, and I would absolutely do it again. The premise is that you cook the squash, fill it with tasty things, crack an egg on top, and then dig in.

Next time, I am going to skip the egg, and add a bunch of cheese into the filling. And some sausage.

Filling
1/2C quinoa, cooked in stock (because I had it)
1 onion
1/2 can black beans, rinsed
~1/2C cottage cheese
1 tomato
1 green pepper
2 leaves of collards
2 cloves garlic
1 hot pepper
1 piece baon

First, get your squash cooking. Chop it in half, de-seed it, rub the inside with olive oil and salt and put it cut-side down on a baking sheet. Slide that thing into your oven as it preheats to 400F or so. Cooking it while the oven preheats will maximize the browning, and that means flavor. It'll probably take 20-30 minutes to cook, check after 20 minutes - the back side should yield a bit when you poke it.


For the filling, start with the bacon. Chop it up, render out the fat. As it nears the done point, add your diced onion, let that go as long as you feel like it, then add diced garlic and hot pepper. Cooking the hot pepper ought to take away some of its bite. I used a hungarian wax pepper. Then throw in the green pepper, collards, and tomato, cook those till they've wilted down, remove the pan from heat, and stir in the beans and cheese. Taste, season, adjust.


Once the squash feel mostly done, flip them over and fill with the filling. I topped these with eggs, which was fine, but didn't add much. Cheddar would be much better. Bake until the eggs are set or the cheese is melted, whichever you're doing (eggs will take 25 minutes, cheese will take like 10), and enjoy!


Oh, don't eat the skin. Too thick.

Tuesday, August 8, 2017

Beet & black bean burgers

I wanted to make some beet burgers. I had an idea of mixing in some faro or wheat berries or something to make a chewy patty of grains and veggies that you could fry til crispy. Then I realized that black beans would make an excellent binder, as would chickpea flour. The trouble, of course, with making veggie burgers of any sort is that for them to taste good, you need to have a gazillion ingredients. Worth it, though! These have a really nice flavor, and excellent textures. And, they satisfy the tasty/healthy/cheap trifecta!

If you're looking for a meatless Monday option, or just want to try a beet burger, look no further.

The actual recipe is super flexible. The base components are:
- shredded root vegetable (beets, carrots, potatoes, sweet potatoes, parsnips, etc)
- a can of beans (any variety)
- egg (to bind)
- flour (of any variety)
- grain (preferably a whole grain that'll have some chew, because the point is to add texture. So, barley, wheat berries, faro, bulgur, quinoa, rice, whatever)
- flavors (think herbs, garlic, spices)
- salt (duh. everything is better with salt)

This version headed down a Mediterranean route. It was both tasty and very satisfying.

- 2 beets, shredded
- half a carrot, shredded (I had half a carrot languishing in the fridge, which was the only reason for its inclusion)
- 1 can of black beans, roughly mashed
- 1/2C chickpea flour
- 2 eggs
- a buttload of parsley, chopped
- ~1/2C wheat berries, cooked
- 1/4C sunflower seeds
- ~1/4C pickled onions, chopped
- 2 cloves garlic
- 2 tsp kosher salt
- 1 tsp peppercorns, ground
- 1 tsp cumin
- 1 tsp turmeric


The only pre-mix step is to lightly toast the garlic, in some oil, because I don't really like raw garlic. Then, mix everything together in a big bowl.

Generously oil a baking sheet, and form little patties. Bake the little patties at 400F, flipping after about 20 minutes, for about 40 minutes total. The goal is that the outside is crispy, and the inside still has a little moisture. Oil your pan generously for extra crunch. The next step, which I didn't try, but will try next time, would be to coat the patties in panko or bread crumbs before baking, for extra crunchy outsides!


These guys definitely have enough structural integrity that they make pretty darn good travel food, if you're looking for things you can eat with your fingers. But, they're also pretty good drizzled with a lemon tahini sauce, or in a pita with some pickled cabbage.


Served with some roasted cauliflower and some socca (that's for a different blog post. Definitely worth making!!)

Thursday, June 29, 2017

Tabouleh

We had a dinner yesterday that felt like a very typical weeknight dinner, and I realized I don't think I've ever written down my tabouleh recipe. It's delicious. This whole thing was delicious, but dinner should be delicious, especially if you have a beagle mentality and all food is something to be celebrated. Start to finish about 45min, which, for us, is a pretty quick dinner. Because half the time we're also washing last night's dishes and we're always making stuff from scratch and yadda yadda yadda. I have colleagues who say they won't make dinner if it takes more than 20 minutes, and I just wonder how that's supposed to work. You can't have popovers, then. 

Anyway, this is a dinner that relies mostly on the oven, and considering the recent break in the heat wave, this was a good night for that. You're looking at roasted cauliflower and broccoli, tabouleh with roasted chickpeas, and popovers. 

I already broke my popover in half to let out the steam, but they look way cooler when it's a leaning mound of puffed eggy custardy awesomeness. 

Start by turning the oven on to 450F. Roughly chop the broccoli and cauliflower, lay it out in a single layer on a sheet pan, drizzle generously with olive oil and sprinkle with kosher salt. Drop that onto the bottom shelf of the oven as it pre-heats. This will maximize your brown bits without overcooking the veggies.

Take a can of chickpeas, rinse them, shake dry and dump onto another sheetpan. Toss with some oil, salt, and zaatar or other spice mixture. Put these onto the top shelf of the oven, which is still preheating. 

Make your popover batter. Make sure the mixture is warm! and that your muffin tins are well greased! I wrote up the recipe here: http://alexjospefood.blogspot.com/2011/12/popovers-update.html. It works, and gets an excellent Ed-rating. We were actually calculating the cost of a batch of popovers, because at one of our favorite farm-to-table type restaurants, you can get a basket of popovers instead of bread, and $10 gets you four popovers. One batch, in the recipe above, yields 6 huge popovers, for about $0.12 apiece. As if you needed another reason to make your own popovers.

Anyway, flip the brassicas if you smell any burning. They probably want 5-7 minutes a side. Once the oven is pre-heated, remove the chickpeas, and put in the popovers. You'll want to not open the oven again until 15 minutes is up, so hopefully your brassicas are done at this point, otherwise they're staying in. Because it's summer, who cares if your broccoli is room temperature? The room is warm. 

While the popovers are doing their thing at 450F, make the tabouleh: 

Tabouleh
1 large tomato
2 mini cucumbers
1 bit bunch of parsley
2/3C dry bulgur
1 lemon
olive oil
salt

Boil 2/3C water. When it boils, remove from heat, stir in the bulgur, and let it sit, covered, for 5min or so. 

Chop the tomato and cucumber relatively finely. Chop the parsley finely. Stir those together in a big bowl with the juice of the lemon, a glug or two or three of olive oil, and a few healthy pinches of salt. When the bulgur is cooked, stir that in. 

This will be even more delicious tomorrow, when the flavors have sat. You can add things, adjust things, whatever - super versatile grain salad. Basil and mint are excellent additions, if you've got them.

Ok, now you have your tabouleh and the popovers are done with the 15-minute period at 450. Drop the oven to 350, and let the popovers cook another 15-20min. Pop the chickpeas back into the oven - they would do best with like 40 minutes at 300F, but that's not what we're working with today, and slightly-roasted/slightly-burned chickpeas are still better than straight-out-of-the-can chickpeas. 

Use your 20 minutes of wait-time wisely. 

When the time is up, if you aren't immediately consuming all 6 popovers, poke them all with a knife and return to the turned-off oven for 3-5 minutes while you put the rest of the food on plates. Sprinkle the chickpeas on top of the tabouleh, or just eat them straight, because they're delicious.

Oh, and bonus if you have some tahini sauce in the fridge - literally just tahini, lemon juice, salt, and water, taste and adjust until it tastes good. It's pretty delicious on the cauliflower and broccoli.

Saturday, April 27, 2013

Beans, beans, they're good for your heart...

I do love me some good beans.  Especially when you put bacon and avocado on top, and eat them with jalapeno cheddar cornbread.  


 The cornbread was easy - buy a tub of cornmeal, follow the instructions on the side, but add in some jalapenos, diced up finely, and grate a bunch of cheddar on top.  I halved the recipe, and it made enough to fit my heart-shaped pan.  Perfect!  I didn't have fresh jalapenos, but I did have pickled ones, and that was pretty delicious - I recommend it.  They came in a can, from Shaws.  I'm sure you can find them at other stores.

The beans were easy, too.  I forgot to soak them this morning, so did a quick soak when I got home - bring to a boil, then turn off and let them sit for an hour.  Drain off the soaking liquid, then add more water, salt, a beef bone (or a pork rib, or a chicken leg, or really any piece of animal with bone and tendons attached to create delicious flavor), a bay leaf, a quartered onion, and 3-4 smashed garlic cloves.  Simmer for 45min, until they're soft.  I think they're best if you let them cool in their cooking water, because then the skins won't break.  

As the beans were cooking, I chopped up two pieces of bacon (mmmm, bacon), rendered it for a while, then threw in half a poblano and another clove of garlic.  That got tossed on top of the beans, plus some avocado chunks, cilantro leaves, and some squeezes of fresh lime juice.  Yes, beans can be delicious!  They really needed a taco instead of corn bread, but hey, corn bread is easier.


The dark green stuff is crispy kale.


Sunday, June 12, 2011

Greek-ish pasta salad


A while ago, Sam and Ross fed us a deliciously tasty Greek-themed salad, with barley and chicken. I was overwhelmed by the deliciousness of the lemon and olives and sweet cherry tomatoes, so set out to make the same thing last week for Ali and myself, as I was staying out there. But, being me, I naturally didn't go to look up the recipe, and sort of did a cross between tabouleh and that Greek salad and a random salad. It was delicious anyway, but I think that's just because I love olives and lemon and feta cheese. Also, having neither barley nor enough time to cook it, I used orzo, which worked really well also, and basically turned this into a pasta salad. So be it. Anyway, I recommend this one for a hot evening when you don't want to cook anything. The only time you have to apply heat is for about 20 minutes to boil water and cook the pasta, then it's back to no heating devices turned on.


Greek-inspired pasta salad
Made enough for 2 very hungry people, with a bit left over for lunch. Would probably feed 4 normal people, or 6 as a side dish
1 can chickpeas, rinsed
1/2lb orzo, cooked and cooled
~1C halved kalamata olives (or another flavorful black olive)
1C halved cherry or grape tomatoes
1/2C chopped fresh parsley
2 tbs chopped fresh mint
1/2 onion, diced
1 cloves garlic, minced
1/2C feta cheese, crumbled
2 small pickling cucumbers, chopped
1/2 orange pepper, chopped
Anything else you have in the fridge that you want to use up

Dressing:
Zest of 1/2 lemon
juice of 1 lemon
about an equal portion of olive oil
salt and pepper, to taste.

Put everything in a bowl. Mix it around. Toss with the dressing. If you let it sit, it only gets better as the dressing sinks in and the flavors all meld.

Thursday, June 2, 2011

Roasted Chickpeas


I had a can of chickpeas lying around, and wanted to use it in a salad. But I also had the oven on, so figured I'd see what happened if I roasted the chickpeas first. I tossed them with olive oil, kosher salt, and stuck them on a baking sheet for 15 minutes, and the result was pretty delicious! They were crunchy on the outside, bean-y on the inside, and a perfect addition to a salad. Will make these again, for sure.

Thursday, October 14, 2010

Texas baked beans

I like beans. But I don't like normal baked beans, the Boston variety I suppose, because I don't particularly like the sweetness. I discovered that Texas baked beans aren't sweet, so I tried making some the other weekend, and they were awesome. I now plan to make a batch of beans every time I'm home, since Ed has the dutch oven, and slow cooking stuff works best in a dutch oven. Apparently, Texas baked beans recipes vary widely, with all sorts of spices and stuff that can go in the pot - it doesn't really seem to matter. As far as I could tell, based on the internet (which never lies), as long as you have beans, water, salt, pepper, and some sort of meat product, you're good to go. I was a little more elaborate than that, but not much.

Don't tell Ed, but I've been hacking off chunks of a giant rack of baby back ribs that he bought a couple weeks ago and stashed in the freezer. I've just been taking one rib at a time, if it weren't for the cut packaging, I'm sure he wouldn't notice... Back to the point, though, that entire rack of ribs cost $5.88. And if you're cooking one rib each week, well, that is a darn economical piece o' meat, especially as you're using the bone for flavor, too.


Right, recipe:

1lb beans (any kind will do, I used pinto this time)
soaking liquid from beans
more water as necessary
1 onion
4 cloves garlic
1 can diced or chunk tomatoes
1 beef rib, or other hunk of meat that will do well with slow cooking. A bone would work, too.
bacon grease, or oil - best yet, fry up some bacon first, then use the grease!
spices, in seed form (cumin and coriander for me) ** optional
spices, in ground form (more cumin, cayenne, more coriander, black pepper)
salt
1 bay leaf

The only dishes I used for these beans were a cutting board, knife, and dutch oven. Its a nice change from how I usually trash the kitchen, getting the maximal number of pots and pans dirty. If you don't have a dutch oven, you can use a crock pot, or just a regular pot and check it and stir it regularly - its more likely to burn things. The dutch oven has nice thick sides that hold heat well, so you can use a lower heat.

First, soak your beans for 6-8 hours (i.e. overnight), or do a quick soak - bring them to a boil, then let them sit for an hour.

Dice up an onion, and sweat it in some bacon grease. We always have bacon grease stored in a can in the freezer, its basically free, since you don't really feel like eating it with your bacon. And, it tastes delicious.

Once the onions are nice and sweaty, add the diced garlic. Let that toast for a bit, and then add any spice seeds you're planning to use - I find cumin leaves a nice flavor if you add it to the fat in the pan and let it pop open.

Dump everything else into the dutch oven. My beef rib was still frozen at this point.

Stir around the mixture so its all evenly distributed, and add enough water (or stock) so that you have full coverage, but don't make it too deep. This photo is showing liquid that is a bit too deep. Bring this to a boil, and once its there, reduce it to a simmer. Let it simmer for ~3 hours. Add the salt near the end, supposedly salt makes the bean skins tough if you add it too soon. But you don't really need to do anything, you can leave the house and just let it keep simmering away, with the lid on.

After 3 hours, it'll look something like this - most of the liquid will be gone/absorbed, the beans should be tender and delicious, and the meat should be mostly fallen off the rib - you can help it along with a fork. Discard the bay leaf and the rib bone, season with salt and spices the way you like it, and eat your beans. I like them with rice, some chopped cilantro, and a dollop or two of greek yogurt.

If there is still too much liquid after 3 hours, take off the lid and let it simmer away for another half hour or so, until the liquid is at a level you find acceptable. It should be pretty thick, and tasty.

Supposedly, and I have yet to test this, you can mash up the leftovers and it makes very tasty refried beans.

Monday, September 27, 2010

7-layer dip tacos


I made some delicious baked beans (texas style, not sweet) over the weekend, and for lack of a desire to cook tonight, turned them into a mess of things on a plate sort of wrapped in tacos. I still have leftover pulled pork, so that went in there, plus an heirloom tomato, avocado, a ton of cilantro, an ear of corn, and a sunrise pepper. And some salt. I had just been to the farm stand, hence all the delicious veggies. It got messy fast, though, my corn tortillas are too dry to hold a taco shape, so the stuff fell out the bottom and out the ends. Hopeless. But delicious!

This made enough for four people, so, just take that as a warning. Or use half of each veggie.


The layering was: Pulled pork, beans, greek yogurt (tastes like sour cream, but better!), cilantro, tomatoes, avocado, corn, salt.

Thursday, May 6, 2010

Bean Gratin

Anna has a cookbook, and I've already forgotten its name, that I was browsing through the other day as we were waiting for cookies to bake. Anna has many cookbooks, but this one happened to be out and was interesting, and I was in the legume section, and saw something for "Bean Gratin". Intrigued, I read the recipe, and it sounded like an interesting way to prepare beans. Basically, you take cooked beans and bake them in a sauce until the sauce reduces more, and then add cheese on top and bake some more until it melts. Although I have some issues with the measurements (when do I not have issues with measurements?), it came out quite nicely, and passed the Ed-test.

The original recipe called for 6 cups of cooked beans, and I wasn't sure how many dry beans would make 6C of cooked beans, so I looked in my pantry and chose the fullest jar of beans that I had, which happened to be about 1-1/4C of white beans. The recipe then called for 1-1/3C rich broth, i.e. a broth that had been reduced a bit on the stovetop. We had some extremely rich beef stock from the oxtails, that was already pretty reduced, so I went with that. Since I ended up with about 2C of cooked beans, I thought I should use 2/3C of broth, but that didn't quite cover them (I also didn't have the 2-quart casserole dish called for - I don't know how big a 2-quart casserole dish is, but since I don't have any casserole dishes, I just went with a pyrex pan. Which was too big, apparently). So, I added about 1/3C water, which at least moistened them.

The rest of the recipe worked great, except that the beans on top dried out (duh. they're being baked, and aren't covered in liquid), but that was ok, because the dried out beans tasted delicious and a bit crunchy. So, although I'm sure the original recipe was delicious, this version is worth making again, too.

Bean Gratin
1-1/4C dry beans (or 2.5C cooked or canned - if canned, rinse them first)
1 bay leaf
1 tbs bacon fat or other fat
~2tbs salt

1C tasty broth or stock
1/2C grated parmesan cheese

If you have dry beans, you'll have to start this early - soak the beans for 6-8 hours, until they've about doubled in size. Then simmer them with a bay leaf and the bacon fat for about 20 min, until they're soft enough to eat. Add the salt, and simmer some more, another 10min or so. Beans other than small white beans will take different amounts of time to cook, just FYI.

Preheat your oven to 375F.

Once your beans are cooked, pour them into a pyrex baking dish - mine is big. I don't know the dimensions. If I weren't lazy, I'd go look it up. But the size doesn't really matter - the wider it is, the more dry and crispy your beans will get, the smaller the surface area, the more creamy your beans will be. I think the goal is for creaminess.

Pour the broth over the beans. Bake for 35 minutes. Take them out at 35min and add the cheese on top. Put them back in the oven for 10 minutes, until all the cheese is melted. If you want it a little browned, you could broil them for a minute or two.

Serve!

This was how much liquid there was - definitely not covering the beans. I might try it in a less shallow dish next time, if I could find such a thing... maybe a pyrex mixing bowl. Does that even work?

They exploded. But that tasted good, so it was just fine.

Added the cheese, and it comes out all glued together and delicious and cheesy and creamy with occasional chewiness/crunchiness. Pretty good.

Wednesday, January 6, 2010

Eating PRO on the go, 2010: Lentil soup


I actually remembered a camera, but it doesn't do much to make this meal look appetizing. Its a pretty simple one, but tasty and healthy, which is good enough for me on a race day. We brought some canned red curry paste, and my little plastic baggies of spices, which is why I have various spices and stuff listed in the ingredients - if I didn't have them, I probably wouldn't bother buying them, since its so expensive that way.

Lentil Soup
Serves 5-6 people, depending on how hungry you are.
1/2lb lentils, we used green ones
1/2 can diced tomatoes
2C chicken stock (made from leftover chicken when we bought a whole chicken instead of just chicken breasts for the pasta)
1 bay leaf
A couple carrots
A couple stalks of celery
1/2 of a ginormous onion
4 cloves of garlic
1 bunch of collard greens
curry paste
A bay leaf
soy sauce

Serve with some brown rice.

Put the lentils in a big pot with the bay leaf, tomatoes, chicken stock, a generous helping of soy sauce (we're a little short on salt), and as much curry paste as you would like - we used ~2 tablespoons of it. Add water to cover the lentils, more water for more soupy lentils, less water for less soupy lentils. Bring that to a boil, while you prep the vegetables. Once it boils, drop the heat back to a simmer.

Chop the carrot and celery into pretty little pieces, rinse and chop the collards. Slice the onion into long slices - you'll be pan-frying the onion and garlic, because that tastes better. Put the carrots and celery into the soup. Put some oil in a pan, and bring that up to a medium-high heat. Add the onion, and stir those around for 5-10 minutes, until they're just starting to brown (but not burn), then add the chopped garlic, and stir that around until its just golden brown. Add that to the soup. Simmer everything for a while, until the lentils taste cooked and the carrots and celery are cooked.

Heat some olive oil

Tuesday, January 5, 2010

Eating PRO on the go: Bean tacos

Tacos are just so easy to make (and eat) when you're traveling, plus they have all sorts of good stuff in them. After the fish tacos, we had some leftover stuff, namely tortillas, that had to get used up. The ingredients for the bean burritos/tacos are below. No picture, because I was hungry!

-whole wheat tortillas
-an avocado
-a tomato or two
-refried beans, heated up
-grated cheddar cheese
-lettuce
-black beans
-brown rice
-taco sauce of some sort

Build the burrito, and try not to overstuff...

Thursday, October 29, 2009

Indian Feast

Leo and Jenny were coming over for dinner, and Ed wanted to make some Indian food. By this, I thought he meant one dish, some dal or something. With some rice, and maybe some naan if he was feeling like going crazy. Well. He emailed me, with a seven-course menu, asking what I thought. Um, how about, we don't make seven dishes on a weeknight? Alas, I could only talk him down to six. They were all yummy, except for the dal, into which I dumped a little too much turmeric, so I had to keep diluting it and adding more lentils, and salt, and some sugar, until the bitterness was manageable. Lets just say we had lots of dal left over.

The man with his creations.

Leo with the bowl of tomato chutney.

Jenny grinning in front of a huge pile of naan.

Jenny brought the naan, and Leo brought the beer, which really are my favorite parts of Indian food anyway, but on the menu was: Red dal, mango chutney, tomato chutney, raita, tofu tikka masala, chana masala, and basmati rice. Given that our stove currently has three burners, this was an ambitious project for sure, but we actually ended up eating by 8pm. I was quite impressed. Most of these dishes are variations on onions and tomato with spices and other stuff, I can't remember what went into each one and I have no idea what happened for the mango chutney - I wasn't there when Ed was making it. By the time I got home, he had most things started, the tofu was marinating and the dipping sauce-type things were done (raita, mango chutney, tomato chutney). The mango stuff was quite delicious, so I'll have to get the recipe from Ed at some point, although he doesn't really do recipes...

I also didn't get pictures of everything - too hungry! This is the Chana masala:
1 can chickpeas
1 onion
2 cloves garlic
1-2 tbs tomato paste
1/2 can tomato chunks
water to thin it out
pinch of sugar
various spices, to taste (cumin, coriander, turmeric, salt, pepper, red curry paste)

Cook down the onion a bit in some oil, add the garlic, add the tomato paste and water and chickpeas, add the spices and keep tasting as you go along. Who cares about authenticity if it tastes good?

Mango chutney. No idea what went in here, although the black bits are toasted cumin seeds. It was good.

Dal - I wasn't really paying attention to this one, but I know there are onions, garlic, green lentils, red lentils, a can of tomatoes, some tomato paste, lots of spices (similar to the chana masala), and then more lentils and tomatoes and salt and some sugar in an attempt to dilute the bitterness from too much turmeric...

Tofu tikka masala - Basically the same as the chana masala except with tofu instead of chickpeas, and the tofu was marinated in yogurt and ginger. I think this needed to be ground up a little, maybe some coconut milk added, some cashew butter, more yogurt, but it tasted good as it was, too.

I didn't get a picture of the tomato chutney - mostly just onions and tomato paste - and the raita, which was yogurt, cucumbers, and mint. And maybe with sugar and vinegar, but I don't remember.

Sunday, August 9, 2009

Pasta in a brown butter sage sauce*

*with roasted cauliflower, caramelized onions, and chickpeas


There is no point to listing out all the ingredients for a pasta dish in the title, because it just makes the title really, really, long. Hence the asterisk. This was another one of those pasta dishes where everything in the fridge gets cooked and put on the pasta. I thought it was good, the butter tasted nutty, in a good way (although can anything be nutty in a bad way? I love nuts). I think I'm slowly learning to enjoy butter. I still won't dip artichokes or lobster in it, but if you use it to cook mushrooms or to brown and put on pasta, its alright. I've always liked it in cookies, no issue there...

Not much by way of explanation here. Give yourself at least 20 minutes for caramelizing the onions and roasting the cauliflower, but those are the only long parts. The chickpeas aren't really necessary, they didn't add much, but I like chickpeas, and they were in my fridge, and needed eating. The pasta used here was whole wheat, hence its dark color. And the onion was a red onion, which is what those purple things are.


Pasta in a brown butter sage sauce
Serves two relatively hungry people

1/2 box pasta
1 cauliflower, any color works, but the carnival cauliflowers are more colorful (purple, green, yellow)
1 onion
1-2 tbs butter
olive oil
1/2C chickpeas
3 tsp dried sage (fresh would work too if you had it)
salt to taste

Preheat your oven to 400F. Thinly slice the onions, so that they make long strips. Put the onion and some olive oil in a frying pan, and add a generous amount of salt. Stir it around so that everything is coated (add more oil as needed), and cook on medium low for about 20 minutes, until the onion is soft and starting to brown. If you taste it, it should be sweet.

Meanwhile, slice your cauliflower and let it crumble into little pieces. Toss the cauliflower with some oil, then spread it on a baking sheet. Sprinkle some salt and about a teaspoon of dried sage on top. Put this in the oven for 15-20 minutes, until the cauliflower is cooked through and a little brown on the bottom.

After you've popped the cauliflower in the oven, get a pot of water boiling. Once it boils, dump in the pasta and cook it until its just a little crunchy. You don't want it fully cooked since you'll finish it in the pan with the butter. As its cooking, make the brown butter sage sauce - I used the same pan as the onions pan. Melt 1-2 tbs of butter, and once its melted add the dried sage. Cook this for a couple minutes (should take about as long as the pasta), and take it off the heat when the butter starts to turn just a little tiny bit brown. You don't want burned butter... you want browned butter.

Once the pasta is at the barely-crunchy stage, drain it, reserving a little liquid just in case you don't have enough butter for your sauce. Add the pasta to the pan with the butter and the onions. Add the chickpeas, and toss everything around. Sautee this stuff until the pasta tastes done - you'll have to keep tasting. Mix in the cauliflower and a bunch of salt (to taste) and you're good to go.

Aaaaand another pasta dish in the books... =)

Friday, June 5, 2009

A pasta dish


I love pasta. Maybe it has to do with being an athlete, and hence being fed pasta at every turn, maybe it has to do with happy memories of pasta parties during highschool xc running, maybe just the convenience of boiling water and having food on your plate six minutes later, or because it was the first food I learned how to cook. I just love it. We don't really eat it that much, probably because it somehow always feels like a cop-out in terms of making dinner - you didn't have enough time to prepare a "proper" dinner and so you resort to just boiling water. But sometimes, we make awesome things to go on top of the pasta, and then it feels like more of a "real" dinner. With green things and stuff. Because no meal is complete without green things. Of course, when we were in Italy, I was totally happy to eat some form of pasta for every meal!

In this case, we were using up the duck sausage that Ed had gotten at Savenor's, and we had some fresh fava beans and morels (fried in butter, of course), and a light white wine sauce on top, altogether it was quite a delicious pasta dish. As they always are...

There's no recipe here. Cook the fava beans in boiling water for 3 minutes, drain them and shock them in cold water, then peel the outer covering thing. Fry morels in butter. Fry up some sausage slices so they get brown. Fry up a shallot, in butter, add some white wine to the butter (of which you need lots) and reduce it for a bit, while you boil your pasta. Toss your done pasta with the butter-wine sauce, serve immediately, glop everything else on top, add some chiffonaded basil. I thought copious quantities of grated parmesan cheese was an excellent addition. Enjoy!

Wednesday, December 3, 2008

Kale and white beans


This meal felt like comfort food, which is strange, because I never ate cooked greens growing up, they were certainly not part of my life at least until the age of 20. Except to look at them and go ewwwwww. So why does boiled kale seem like comfort food to me? I have no idea. A while ago I was trying to figure out what to do with some leftover kale, I had made a kale, white bean, and sausage soup, which was delicious, but I had leftover kale. I could have made kale crunchies, but that seemed like too much work. Then I found this post, and she writes about her kale so poetically that I had to try it. I kind of did my own thing, since I had leftover beans, too, but this bowlful of glop was totally inspired by that recipe. If you aren't into fried eggs with runny yolks (and I know Ed doesn't like runny yolks, but thats how I love my eggs- crunchy on the bottom and goopy on top), you could cook your egg over easy or just leave it out, but, I really do think the yolk adds something to the overall dish. Ups the yum content...

So, this dish also goes really well with some sort of thick, whole-grain, toasted bread. I happened to have some of that leftover from the soup (because all soups go best with bread), but, like pretty much everything I make, its a flexible dish. You could leave out the bread. You could leave out the beans. You could leave out the egg. You could leave out the bacon. It all works, but, I like kale with all its accoutrements.

Boiled kale with stuff
Makes two servings, more or less. Maybe three if you don't eat much.

1/2C white beans (dry), or 1 can white beans (cooked)
1/2lb kale (those big bunches at the supermarket are about one pound)
3 pieces of bacon
1 onion
4 cloves of garlic
two thick slices of whole wheat bread, toasted
1 bay leaf
salt and pepper
2 eggs

The total cook time will be about half an hour, but its an easy half hour, you're just boiling things. If you forget to soak the beans, the cook time could be more like an hour and a half... so just stick the beans in a pot of cold water before you leave in the morning and they're ready to cook when you get home. Prep time is pretty short, too.

Soak the beans for 8 hours, or do a quick soak, where you bring the water to a boil and then let them sit for an hour. Or buy canned beans, but, its a lot cheaper (about eight times cheaper) to buy the dry ones. And then you can flavor them.

Bring your soaked beans to a boil, and then turn down the water to a simmer. Add a bay leaf. These will take 20-30 minutes to cook, I didn't time it, just keep checking them. Meanwhile, chop your bacon into little pieces, however big you want, you can leave the pieces all stuck together when you do this, they'll separate as they cook. Throw the bacon into a pot, and cook it until it is at a consistency at which you would eat it. In other words, no raw bacon. Instead of draining the grease into wherever you drain grease, drain it into the bean water. If you have lean bacon that doesn't drain, add about a tablespoon of olive oil to the bean water. I find the fat helps the skins get soft. At this point you can add salt to the beans, too, about a tablespoon or so.

Chop your onion and dice your garlic. Add the onion to the bacon in the pot, and cook until they're translucent. Add the garlic and cook until its toasty golden. Add 3-4 cups of water, and bring it to a boil. Take the leaves off the stems of the kale, chop them up, and add them to the water. Its probably a good idea to wash the kale first, but, I forgot, and it wasn't gritty. Add salt and pepper to taste. Cook the kale for 15 minutes or so in boiling water. This is plenty of time to clean up the mess you just made prepping dinner.

Toast some bread. Fry an egg, I actually used olive oil, and it got really nice and crispy, just how I like it! Once the beans are done, layer a piece of bread in a big wide bowl, then stack some beans around it (throw out the bay leaf). Put a big ol' pile o' kale (and bacon) on top of the bread. If you want soup, pour in some broth, otherwise, just the kale. Put the egg on top. Break the yolk, and mix everything around until you have a delicious, yolk-soaked, pile of glop. Dig in!


Thursday, March 20, 2008

Black bean burgers! (with mango avocado salsa)


Sometimes, Russo's (the place I go to get veggies) has sales on cases of mangos. $6 for 10 mangos, it is always too good a deal to pass up, since I love mangos, but what does one do with 10 mangos?? Well, mango-avocado salsa is a good place to start. This stuff is so good I could just eat it with a fork, but sometimes you need something else to go with your mango salsa, so I made some bean burgers. I'd made some of these before, and they weren't nearly firm enough, so this time I added an egg to hold them together and some rice to dry them out (I would have used breadcrumbs if I'd had any of those lying around, but the rice worked well). They were good! The test will be if Ed likes them...

Ingredients
3.5C cooked black beans (~1.5C dry)
1C cooked rice (1/2C dry)
1/2 onion
1/4 red pepper
1/2C parsley
1/4C cilantro
1 egg
1/3C flour
1 tbs bacon grease or butter
4 cloves garlic
2 jalapenos
Dash of hot sauce
1.5 tbs salt
Other seasonings: coriander, cumin, pepper, cayenne, whatever you think would taste good.
There are a lot of ingredients here. The only thing that is super important is the egg, bacon grease, flour, beans, and rice. Everything else is for taste.

To cook the beans:
Count on about 2-2.5 hours for this. You can either soak the beans for 8 hours, or you can do the “quick soak” method: Stick your beans in a pot of water, bring it to a boil, then turn it off and let it sit for an hour. This is not an ideal method of soaking if you wanted whole beans, because it loosens the skins, but that doesn’t matter when you’re mashing up the beans for burgers. After an hour, drain the beans, put more water in the pot and two bay leaves, and simmer the beans for another hour or so, until they’re super tender.

To make the patties:
As your beans are cooking, add about a tablespoon of bacon grease (better flavor) or butter to a frying pan. Add your four cloves of minced garlic and your half a diced onion. Sweat the onion, then add 1/3C of flour, and cook it briefly, until it has soaked up all the remaining grease. If you don’t cook the flour, your bean burgers will taste like raw flour. Alternatively, skip this step and use breadcrumbs, but I didn’t have any breadcrumbs.

In a large bowl, mash your cooked beans with a potato masher, or you can use a food processor. I found I had to add about 2 tablespoons of water when I used the food processor. Add everything else and stir it around until it is a homogenous glop. The rice will help hold it together. Form the patties. Ideally, you’ll let these sit in the fridge for an hour or two to let the flavors meld, but really, who has that sort of time or patience??


The raw patties...

Heat a cast iron frying pan or a skillet, and grease it lightly. Again, bacon grease would be best, but sometimes its just easier to use butter. Get it pretty warm, medium-high, and once the butter is sizzling and threatening to burn, throw on a couple bean burgers. Turn the heat down to medium at this point, finish browning the first side, and flip them to do the other one. They want to be fully cooked, because its not such a great idea to eat raw eggs, and they’ll hold together better when they’re cooked.

Cool them on a rack, adding some salt if you think they aren’t salty enough, and then enjoy them as you would a hamburger, or plain, or with mango salsa.

Mango Salsa
2 Mangoes
1 avocado
1 red onion
1 clove garlic
1C chopped cilantro
1 jalapeno (this makes it a mild salsa. Add another pepper or two for more kick)
1/2 lime, juiced
~1 tbs salt

Dice everything, put it in a bowl, mix it together.

Burger Buns
This is pretty much the same recipe as the sticky bun dough. So, you could make half a batch of buns, and half a batch of sticky buns, if you wished.

2 eggs
Hot water to make 2C
2 tbs sugar
1 tbs (1 packet) yeast
2 tbs butter, softened
2C whole wheat flour
1 tbs salt
3-3.5C white flour
Sesame seeds (optional)

Crack two eggs into a two cup measure, and fill the remainder with warm water. Mix this thoroughly, then put it in a big mixing bowl. Add the sugar, beat well. Add the yeast, stir, and let it sit for about 10 minutes until it is frothy.

Add 2 tablespoons of melted butter, then the whole wheat flour and the salt, and start adding and mixing the white flour until the dough starts to pull away from the sides of the bowl. Dump it out on a floured board/table, and knead until it is slightly tacky but smooth and shiny and does not stick to your hands (about 10 minutes). Clean your bowl, grease it, and return the dough to the bowl. Let it sit at room temperature covered with a damp cloth about 1 hour, or until it doubles in size.

Separate the dough into about sixteen pieces, and roll them into balls. Then flatten them as flat as you possibly can. They’ll look way too flat, but they’ll rise a lot in the oven, so you want them looking like mini pizzas. Sprinkle the tops with sesame seeds, and lightly press the sesame seeds into the dough so they don’t fall off.

Line a cookie sheet with parchment paper and put your flat balls of dough on it. Place this in a 400 degree oven for 5 minutes, then turn down the heat to 350 and finish baking until they look done. Cool and slice in half to make buns.

Saturday, January 5, 2008

Eating PRO on the go, parts IV, V, and VI


Cookin' skier style!

I'm falling a little behind here... Day four, we had pasta and sauce. Somewhat generic, but skier fodder the night before a long race. Two other girls came over, and they brought some enchiladas they had made, which were a fantastic appetizer. The pasta we cooked in the microwave, about half a box at a time in a big bowl of water. We used small zitis, which were not quite as good as the Annie's shells, but might have been better with some stirring. For the sauce, we microwaved some onions and mushrooms and then threw that in the crockpot with some canned sauce. No pictures, but it worked.

Day five


Chili! We threw a bunch of cans of stuff into the crockpot before leaving for the race today.

2 large cans of tomato chunks (put these in last, until the chili is at a consistency that you like)
1 can black beans
1 can red beans
1 can pinto beans
1 can corn kernels
1/2 white onion
1/2 yellow, red, or orange pepper
1C chopped mushrooms
1/4C chili powder
2 tbs hot sauce

We let that do its thing in the crockpot until we got back, about 6-8 hours. Then we ate it with the leftover corn tortillas from taco night, and some shredded cheese on top. Served 7 hungry skiers (probably 8-9 normal people).

Day Six

We'll call this random night. We ran out of food and wandered into the grocery store, and walked out with some sweet potatoes, bananas, cheese curds, salad dressing, smoked salmon, and two loaves of artisan bread. That fed 7 people for $30, and we hit all the colors of the rainbow when we added a salad topped with beets and chickpeas.

Lunches, snacks, and other munchies


Such a pretty sandwich! hummus, beets, cucumbers, and bean sprouts. The hummus was pretty goopy for this use, but it was delicious.


Annie's Mac and Cheese: an absolute staple.


Vanilla yogurt, walnuts, and banana. Perfect post race food.

Also, lots of Wheat Thins, Cheezits, sesame sticks, dried fruit, fig newtons, nature valley granola bars, carrots and hummus, and soy nuts. Yum!

So, I guess the point of these posts is that you can indeed eat well while living in a hotel room, for a reasonable price. We ended up feeding 6-7 people (sometimes some people went out) for 7 nights for $170. Not too shabby!