Wednesday, December 8, 2010

Croque monsieur

When my mom was visiting last weekend, she bought me cheese, one block of which was some emmental. That made me think of grilled cheese sandwiches, so I went to the store to buy some bread. And then I decided that I wanted to make a croque monsieur, which involves ham (didn't have) and bechamel sauce (have never made before). Not one to be daunted by something as little as not having an ingredient, I used salmon pate (also courtesy of my mom) in place of ham. And then I looked up some recipes for bechamel, and it didn't seem that hard. In the end, it was a success! Deliciousness.

So the first task was to grate some cheese. Ok, grate a lot of cheese.


Then, I made the bechamel. It was hardly a traditional sauce, as I went for the kind with an egg in it, and you're supposed to just use the yolk, but I didn't have any immediate uses for egg whites, and I hate wasting food, so I just beat the whole egg and used that. I also put a bunch of garlic in the sauce. It made everything taste garlicky, which was a good thing. And the final change was that I didn't add any nutmeg - I didn't have any.

Bechamel (Alex's version...)
Made ~3/4C?

2 tbs butter
2 tbs flour
~3/4C milk
1 egg
salt and pepper to taste
1 clove garlic, minced.

Mince the garlic. Melt the butter in a saucepan (or frying pan, if you're me). Once its melted, add the garlic, and cook that for just a little bit until it smells delicious. Add the 2tbs of flour all at once, and whisk until its smooth. It should be a thick paste-like substance now, with a couple lumps of garlic. Add the milk, and whisk some more. The milk thins things out, but then you cook it for another couple minutes (less than 5), and it thickened up again. Take it off the heat, and season with salt and pepper, tasting.

In a separate bowl, beat the egg. Add a little (~1/4C) of the hot bechamel to the egg to temper the egg, then add the egg-bechamel sauce back to the larger quantity of it. Whisk some more. Done! Set aside until you're ready for it.

Melt the butter.

Add the flour and whisk - it turns into a thick paste.

Add the milk, cook for a bit, and when it pulls away from the bottom of the pan, its thick enough.


Meanwhile, spread your salmon pate (or ham, if you're being all traditional - I think ham would have been better in this position than salmon pate, honestly) on one side of the bread. Mustard would be good here, too. Put some cheese on the other half, and close into a sandwich. I ended up taking off some of the cheese shown here, because I ended up making two sandwiches, and didn't feel like grating more cheese, so had to share the cheese.

Butter a baking dish, and put your sandwich(es) onto it. Spoon the bechamel over the top, nice and thick and gloopy. Top with more grated cheese, and bake for ~15 minutes at 400F.

After 15 minutes of baking, turn your oven to broil, and check every minute. Once the cheese is brown and delicious-looking, its done. Pull out the sandwiches.

Yum. One of these bad boys filled me up quite nicely after a 2hr run this morning...

To continue with the non-traditional way of making things, I topped the sandwich with avocado. Avocado makes everything taste even more amazing, because avocados are awesome.


Leftovers heat up nicely in a toaster oven, to get that crunchy crispy cheesy top again.

Thursday, December 2, 2010

Pecan Pie

I have never made a pecan pie before, and since I know that they're not good for you, its probably not a good idea to make one and leave it sitting around, where I'll end up eating 4000 calories of pie over the course of a day. I kid you not, they're heavy duty. And DELICIOUS. So, I figured, why not experiment on Leo and Jenny? It might turn out to be a total flop and never set up, but then we can pick out goopy pecans from the filling and eat the pie crust on its own, Leo and Jenny are those sorts of people. My sorts of people. But in the best case scenario, it'll all work! To help with my endeavors, I followed a recipe. Sort of. I'm just incapable of properly following one of those, but what I did, worked out. The recipe I tried to follow is here. But I've reprinted what I ended up doing.

Maple pecan pie
3/4C maple syrup
1/4C molasses
3/4C dark brown sugar
1/4C white sugar
3 eggs
3 tbs melted butter
1 tbs flour
1 tsp vanilla extract
1-3/4C pecans

Pie crust for one pie bottom.

Preheat your oven to 350F. Mix everything together except the pecans. Put the pie crust into a greased pie pan. Put the pecans in the crust, and pour the filling over the top. Bake for 1hr, until it puffs up, and a tester comes out clean. Let it cool a bit before you try and eat it, or it'll be runny.


Wednesday, December 1, 2010

Hearty turkey lentil stew


I was going to just make a lentil soup, today, but then I realized that I could totally put turkey in it. Still not nearing the end of the turkey leftovers, which have now migrated to the freezer. Anyway, this is quite glop-ish, but, its tasty and warm and fairly comforting, if you're at the end of a cold, rainy, exhausting December day.

Lentil glop stew
Made lots and lots, but that is because I put lots and lots of veggies into it. Basically three huge servings

~1/2C dry lentils
1 can diced tomatoes
1C turkey stock
1/2 broccoli
1/2 zucchini
1/2 eggplant
a bunch of mushrooms
2 cloves garlic
1/2 green pepper
1C chopped kale
olive oil
1 bay leaf
salt
pepper

Start by putting on a pot of brown rice. This is a very brown-rice-appropriate sort of meal. Yea hippies!

Put the lentils, turkey broth, tomatoes, and bay leaf into a pot and bring that to a boil. Once it boils, lower the the heat to a simmer.

Meanwhile, in a frying pan, cook all the veggies. Once they're as done as you like them (i.e. cooked, but with some bite, still), pull that pan off the heat, and taste the lentils. Salt and pepper them, and if they're done, dump in the veggies, and serve. If they're not done, wait. (instructions for how to make lentils: cook until done).

It took about 20 minutes, total.

Enjoy with rice, or bread, or just on its own.


Tuesday, November 30, 2010

Turkey Thai curry soup


Yup, more turkey leftovers posts! In this one, I make a curry. With lots of lime and cilantro. All the other stuff that goes into it is optional, but I recommend going heavy on the veggies, it tastes better and is better for you. Pretty much everything in this recipe is optional except the curry paste, coconut milk, lime, and cilantro. So, go wild...

Turkey Thai curry
Made about three servings

1 can coconut milk
~2tbs Thai red curry paste (I have some Thai Kitchen brand kicking around, used that)
1C turkey stock
1 lime
~1C cilantro
~2C chopped, cooked turkey
1/2 jalapeno
2 cloves garlic
a bunch of mushrooms
1/2 broccoli
1/2 eggplant
1/2 zucchini
1/2 green pepper
Oil
Salt

Heat some oil in a big frying pan. Chop the garlic and the jalapeno, and throw those in. Chop all the other veggies into bite sized pieces, and throw it into the pan, but reserve about 2 tbs of chopped cilantro for garnish. Once its all in the pan, add the coconut milk and curry paste - taste as you go with the curry paste, you might not want that much if you don't like spicy things, but the more you add, the more it tastes like curry. Also, its not on the ingredients list, but I highly recommend putting in some fresh ginger, too. Zest the lime, and put the zest into the curry. Add the turkey broth and the turkey, make sure everything is mixed together, and let it simmer away for 5-10 minutes, until the veggies are at a state where you like to eat them.

Once the veggies are cooked, pull the pan off the heat, and serve over a heap of rice, or just in a bowl as a soup, garnished with some cilantro. Squeeze lime juice over the top. If you want it more soupy, add more turkey broth, if you want it more curry-like, add less broth.


Also, use all your leftover veggies tomorrow, in the hearty turkey lentil stew.

Monday, November 29, 2010

Creamy turkey en croute


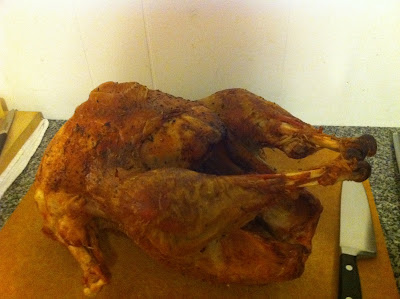
Yup, we cooked a turkey, the smallest one we could find (at 13 pounds) for three people. Because Jenny doesn't eat turkey. Needless to say, we have lots of leftovers.

mmm, so good at the time, so not-good as leftovers. But that's referring to the cold type of leftovers. This is totally transformable. I think my hatred of sandwiches extends to cold turkey breast.

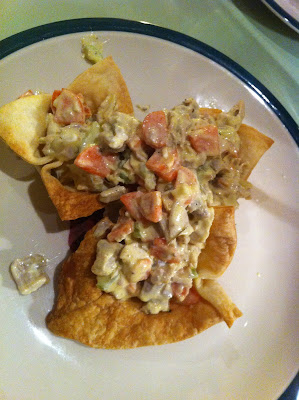
We also had some leftover pie dough, enough for one pie. I thought about making another pie, but Ed took the pie dough and made little mini-pie-crust-things, and we put a leftover turkey mixture into those. Actually quite delicious! I will call it, turkey en croute! Sort of.


The shell was a blind-baked pie crust. Roll it out, and cut into squares, I think they were ~4" per side. Stuff those into a greased muffin tin, poke a bunch of holes (with the tines of a fork) into the bottom, and bake them at 350F for ~15 minutes, until they're golden brown. You'll end up with pretty little cups for putting filling into.

Creamy turkey filling
Made enough for four hungry eaters

Olive oil
~2C leftover turkey (white or dark), cut into bite-size or smaller chunks
2 carrots, diced
2 stalks of celery, diced
1 onion, diced
2 cloves garlic, diced
~1/2C turkey stock (optional?)
~1/2-1C greek yogurt
salt and pepper, to taste
~2 tsp rosemary

We happened to have some greek yogurt, so that is what turned into the creamy part of the creamy turkey filling. Greek yogurt is awesome, by the way - tangy, thick, and almost (if you squint your eyes) good for you. Buy the full-fat stuff, by the way, it tastes better. We got ours from the greek place, which means its definitely full fat.

So, heat some olive oil, toss in the onion, add some kosher salt, and let that sizzle away for a few minutes. Add the rosemary and let that sizzle until things smell like rosemary. Add the garlic, toss it around until it smells fragrant, then add the other veggies and the turkey stock. Cook those down until they're basically done, taste one to see how crunchy it is. Add the turkey, toss it around until its warmed up, then pull the pan off the heat and stir in the greek yogurt and some pepper. Taste, and adjust the seasonings as needed.

Lump some creamy turkey into the pie dough shells, and serve while warm. Its delicious!

Monday, November 22, 2010

Nachos!


I'm not sure if I've ever made nachos before. The premise is pretty simple, cover tortilla chips with grated cheese and heat until the cheese melts. But I've always preferred the chips that have way too much stuff on top, sort of like my overstuffed burritos, so just chips and cheese isn't going to cut it. Then there is the consideration that tortilla chips are the best calorie-per-dollar food you can get, which doesn't put them in such a good light in terms of healthiness. I wanted something goopy and cheesy and warm, though; its been a rough week and weekend. I experimented with making some oven-toasted corn tortillas, and those worked well as chips - no deep-frying necessary. And then I loaded up an entire dinner's worth of food on top of those, with a ton of cheese, and voila! nachos. Alex-style.


Nachos, Alex-style
Made enough for definitely more than one Alex

~1/3lb ground beef
3 tbs Alton Brown's taco seasoning
1 red onion
1 clove garlic
some spinach
6 corn tortillas
1 can black beans
1/2 block of cheddar
1/2 avocado
1 jalapeno
~1/4C salsa
~1/4C olives (kalamata in this case)

Preheat your oven to 400F. Meanwhile, set a pan on your stove, and turn it up to medium-ish. Dump in the beef (I used ground sirloin, and it was durn tasty). Add the garlic, half the onion, and the taco seasoning. Let that cook away, stirring occasionally to break up the beef.

Take your six tortillas, stack them, and cut them into wedges. I cut each into eight wedges. Spread them on an ungreased baking sheet, and bake for ~10 minutes. Take them out when they're crispy and just browning around the edges.

Once your beef is done, add the beans, stir that around for some flavor, and put it all in a bowl. Dump the spinach (maybe two handfuls) into the pan, and stir that around until it wilts thoroughly.

Grate the cheese.

Put your "chips" into a smaller baking dish, so that they're a bit overlapping. Sprinkle on the rest of the onion, the chopped jalapeno, and the olives, and cover with a couple spoonfuls of salsa. Cover that with the spinach, and some (probably about a third) of the beef/bean mixture. Put the grated cheese all over that. Put the entire concoction back into the oven, for another 10 minutes or so.

Dice the avocado. I only ended up using half of it, but the whole thing would have been scrumptious, as would have been some cilantro. Alas.

When the cheese is melted and a little brown on top, your nachos are done. You can eat them straight out of the pan, or attempt to transfer them to a plate. Sprinkle with the diced avocado, and enjoy!

Yes, this is how I like my tortilla chips - loaded. Also, yes, I was eating dinner in front of my computer. This is not a rare happenstance, unfortunately...

Friday, November 19, 2010

Rosemary pecans and cranberries


One of the things in my giant Trader Joe's care package from TNC when I left was a pack of these rosemary pecans and cranberries. They were delicious, and I figured they couldn't be that hard to replicate, so, I went ahead and experimented. I think it worked out, although I overcooked them by about five minutes. Basically, you just melt some butter and sugar in a frying pan, add rosemary, let that cook for a while, throw in the pecans and cranberries, toss around until they've absorbed all the fat, toss with some kosher salt, and bake for 10 minutes. Deliciousness!

Rosemary pecans and cranberries
Made about two cups
~1C pecans, chopped
~1C craisins
~1tbs rosemary, dried
2 tbs butter
1 tbs sugar
~2tsp kosher salt

Preheat your oven to 350F. Melt the butter in a frying pan with the sugar. Once the sugar is dissolved, add the rosemary, and let that cook in the hot fat until it smells like rosemary. Should smell delicious. Add the pecans and cranberries, and stir those around until they've absorbed all the fat. It should take less than 5 minutes. At some point, sprinkle with ~2tsp of kosher salt. Once there is no longer anything left on the bottom of the pan, dump your fruit 'n' nuts on a baking sheet. Shake it a bit to spread the mixture evenly, and bake for 10-12 minutes, until the mixture is mostly dry. You don't want to overbake, as the cranberries will get hard, and the nuts will taste burned. No good.

How do you eat this deliciousness? Sprinkle on salads, on mashed sweet potatoes, eat them as a snack, heck, I put some in my oatmeal. They're crunchy and caramel-y and rosemary-y. A good combination.

Wednesday, November 10, 2010

Oven-roasted broccoli


I roast vegetables in the oven a lot. Usually I don't do broccoli, but I had wanted roasted brussels sprouts, and they were all out of those at the Big Y. So I got broccoli, and pretended it was Brussels sprouts. The result was surprisingly similar, green thing that tastes roasty. Yum. Anyway, if you're sick of doing broccoli in the same old ways of however you normally do it, here is an idea for you.

Chop up the broccoli into bite-sized pieces, and put it in a pile on a baking sheet. Drizzle with some oil - the stuff will soak up oil like that's its job, so be sparing. Then toss with your hands until each piece is reasonably well coated. Sprinkle some kosher salt on top, and bake at 400F for ~15-25 minutes - when it stops making crackling noises, its probably done, so take a look at it. Enjoy!

Tuesday, November 9, 2010

Sage-butternut squash gnocchi


Tossed in a sage-brown butter cream sauce. Holy richness deliciousness, those were good. I've made pumpkin gnocchi before, but never butternut squash gnocchi. But, its yellow, and has a nice flavor, so I figured that was good enough for me. The gnocchi turned out nice and light, which I counteracted by adding lots of butter and cream. If I'd had booze, I would have added that, too, just to get the trifecta. Anyway, this dish took a little planning ahead to prepare, because first you have to roast the squash, mash it up, and let it drain a bit. Then you add flour and spices, roll into snakes, cut into gnocchi-sized pieces, and boil. At the same time as making the sauce. It all works out, in the end. I meant to take blurry pictures along the way, but I forgot. You're probably not missing much.

Scroll down for the caramelized onion, and sage-brown butter sauce recipes.

Sage-butternut squash gnocchi
Made enough for 4 servings, or 3 for really hungry people

1 butternut squash
olive oil
1 onion
1/2 packet (a couple sprigs) fresh sage, or dried sage
kosher salt
Flour (~2C?)
Various fall-flavored spices

First, roast your squash at 350F for 30 minutes. I did this by cutting it in half, lengthwise, scooping out all the seeds, smearing some olive oil and kosher salt on the cut side, and putting it cut-side-down on a baking sheet. Then I put the baking sheet in the oven for 30 minutes, until you could poke through the skin of the squash really easily with a fork. Easy peasy.

Once the squash is cool enough to handle, scoop the flesh out of its skin, and put it in a bowl. Mash the flesh with a potato masher, or a food processor, or a fork, or whatever you use to mash things. If you have time, put the mashed flesh into a sieve of some sort and let it drain for an hour or two to get out extra water. If you don't mind just using extra flour, forge ahead without draining.

Add ~1tsp of kosher salt, ~2tbs chopped sage (less if you're using the dried variety), and other spices of your liking. I suggest: cinnamon, black pepper, coriander, cumin, cloves, dried ginger, garlic, whatever you think would taste good. I think I used a combination of cinnamon, ginger, cumin, and pepper. It was tasty.

Stir that around so that its all mixed in. Then add some flour, about a cup, and mix that around. If its too wet to roll into a snake, add more flour. I think I ended up adding about two cups worth of flour.

Once the dough is dry enough to roll, pull out a handful at a time, and on a well-floured surface, roll it into a snake. It'll be loose, but as long as it holds its snake-like shape, you're good. Then cut the snakes into ~1/2" chunks, making sure to not let them stick together. Put about 15-20 pieces at a time into a giant pot of boiling water. The more water you have, the less likely your gnocchi are to stick to each other. When you add the gnocchi to the water, they'll all sink. Give them one gentle stir to make sure they're not sticking to the bottom, and then wait. They're done cooking when they float to the top. This took a little under 5 minutes for mine. Once they're floating, scoop them out with a slotted spoon and toss with the brown butter sauce.

Keep cooking them in batches until you've used up all the dough. Alternatively, freeze some of them - I don't know how this will turn out, but, I put about half the batch into the freezer. I cut them into gnocchi shapes, then laid them on a sheet pan to freeze individually. Once they were frozen, I put them all in a ziplock bag, with the date. Good for next time!


Caramelized onions

1 onion
~2-3tbs olive oil
kosher salt

Peel the onion. Chop it in half lengthwise. Slice across the grain, so that you end up with little half-rings. Heat the oil in a frying pan. Add the onion, and a good dose of kosher salt. Stir around, and let it cook for ~15 minutes, stirring occasionally. Add more oil as necessary if the onions start to stick. When they're golden with brown edges, they're done - taste one. It should taste sweet and delicious.


Sage brown butter sauce

2-3 tbs butter
~1/4C fresh sage (or half that dried)
~2tbs cream (I used light cream)

Melt the butter in the onion frying pan (after taking out the onions). Add the sage, chopped coarsely. Cook for a while over medium heat, until the butter looks sort of brown-ish. Add two splashes of cream, and stir around. Taste. Add salt and pepper if you want. Pour over gnocchi, sprinkle some caramelized onions on top, and serve.

Saturday, November 6, 2010

Chocolate chewy everything cookies


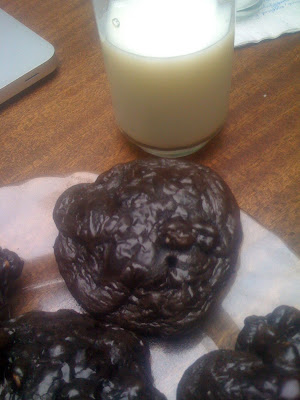
A while ago, I made some chocolate chewy cookies, I think following the epicurious recipe. I had mentioned back that that you could also follow the King Arthur Flour recipe, which is basically the same thing, so I tried that one today. Except, I added toasted walnuts, craisins, and white chocolate chips. Which really made things even more delicious. These were the cookies that took three egg whites (from the biscuits that I made with three egg yolks). The only downside, is that I only had the "special dark" cocoa powder, and it made things a bit too chocolately, if that is even possible. Maybe I'll use less cocoa next time. Anyway, these cookies were, as promised, chewy and delicious. The shininess is a bit off-putting at first, but then you taste the cookie, and it doesn't matter anymore that they're shiny.

Chocolate chewy everything cookies
Made 11 giant cookies

2-1/4C confectioners sugar
1C special dark cocoa powder
1/4tsp salt
3 egg whites
2 tsp vanilla
~1/2C white chocolate chips
~1C toasted walnuts
~1/2C craisins

Preheat the oven to 350F. Mix everything together. This made a pretty thick paste for me. Grease the cookie sheet, and plop down some cookies. They spread a little in the oven, but nothing horrible, not like last time when they turned into brownies.

Bake the cookies for 8-13 minutes, until they're crackly on top. Mine took 13 minutes. Don't overcook these cookies, or they won't be chewy, and that is the whole point.

Thursday, November 4, 2010

I make a darn good chicken stew

So the last couple weeks have been decidedly not-normal in the whole $30/week thing. Mostly its been because we've had friends in Amherst, and dinners at Peter and Gail's house, and Ali's house, and eating out way too much, and then a sudden trip to Boston to go vote, and basically, life just got crazy. I have been shopping, last week I bought corn flakes, and this week I bought two boxes of corn flakes (buy one get one free!). Yeah, basically I've just been scrounging around and coming up with food, somehow. Sometimes, its cereal for dinner. I have actually cooked things, and we've cooked things at home too, but with no camera, it just doesn't seem worth writing about. Sirloin tips - get some sirloin tips, those were delicious, and only $6/lb from Whole Foods, when all Ed and I could agree on for dinner was that we wanted something bloody.

Anyway, today I took a photo, and it was actually a very tasty recipe. I had some frozen chicken drumsticks, from when Ed went to the fresh-killed poultry place, and I also had some very floppy and almost dead celery and carrots. So, chicken stew it became. I think this would get a good Ed-rating, but he isn't in Amherst, so all I can do is guess. But its plenty rich (I DO have butter), and a bit spicy thanks to the floppy jalapeno I found in the carrot bag, and quite delicious paired with crunchy-on-the-outside, flaky-and-tender-on-the-inside biscuits. This was a darn good meal!


Chicken Stew with biscuits
Made 2-3 servings, depends how hungry you are

2 drumsticks
3 carrots
3 sticks of celery
1 onion
2 cloves of garlic
olive oil
1 zucchini
rosemary
1 jalapeno
chicken stock (or water)
1 bay leaf
1/2 potato
2 tbs butter
2-3 tbs flour

First things first, get about two cups of chicken stock (or water) boiling in a medium-sized pot. Once its boiling, add the bay leaf, the drumsticks, one carrot broken into 3-4 chunks, and the flowery tops of the celery that you'd normally not eat. You'll pull out the carrot and celery chunks in a bit. Reduce the heat from boiling to simmering, and leave it be for ~30min.

For the veggies, heat some oil in a pan, then add the diced onion. Once that is sweated, add the finely diced garlic and about a tablespoon of rosemary. Stir that around until it smells fragrant. Add the diced pepper, which is totally optional, by the way, but I liked the heat it added. Add the chopped celery and carrots, and let that cook away until the carrots are soft. Then you can add the zucchini. Take that pan off the heat once things are cooked.

As all this stuff cooks, prepare the BISCUITS! Apparently, I've never written about biscuits on this blog, so the recipe I used is below. It loosely follows Alton Brown's biscuit recipe, which I'm sure is much better, but, I didn't feel like looking it up, so I just used this one, which worked.


Biscuits
Made 12 lumpy biscuits

2C all purpose flour
1tbs baking powder
1 tsp salt
1/2 stick butter - grated
3 egg yolks *
1C milk (skim)

*Use 2 eggs, normally. I just happened to make cookies that called for 3 egg whites early today, so I had extra egg yolks, and figured I'd use them up.

Mix together the flour, salt, and baking powder in a big bowl. Using the big holes on a square cheese grater, grate the butter into the flour. This puts it into little chunks, or if you have a pastry cutter, I hear those work, too. Use your fingers and work the butter and flour together with your finger tips, for exactly 37 seconds (this is according to Alton Brown). The butter grates better if it is frozen, but mine was only refrigerated, and it worked out.

In a separate bowl, mix the eggs and milk. Dump that into the dry stuff. Mix just until its combined, no longer. Plop 12 little heaps of biscuit batter on a greased baking sheet, and bake for, oh, 20 minutes or so, at 400F. Keep checking after 15 minutes, and take the biscuits out when they are golden brown, and the chunky bits are darker brown. They'll be crispy on the outside, and flaky and tender on the inside. Delicious!

Now back to the stew. When you deem the chicken to be cooked, take out the celery and carrot chunks, and drop the diced, half a potato into the pot. Meanwhile, make a roue. Melt the 2tbs of butter, and whisk in about 2 tbs of flour. I eyeballed it. It turned into a thick pate a choux, I think that is what its called - looked like batter of some sort. I dumped that into the stew, and whisked for a while, and the broth got thicker. Then I took out the chicken, used two forks to remove the meat from the bones, and dumped in the veggies. Voila! Chicken stew. Serve with biscuits. Perfect for cold, rainy days like this one...

Thursday, October 14, 2010

Spinach salad

I thought I did pretty well at the grocery store this week - no time to get to Sunset Farm. There was a little impulse spending, though, like the avocado, the olives, and a whole bunch of fruit that is neither in season nor from this country. Anyway, I wasn't going to get salad-makings, because salads just take a whole lot of time and effort to make and there is rarely enough leftover for lunch the next day, but the Big Y had a giant tub of baby spinach on sale for $3.00 - ok, done. Probably means it will go bad in a day, but then I'll just cook it. I made it out of there for $24.83, just under that meaningless $25 limit I've set for myself, but I was impressed, given that I went in there with no list, and a lot of the stuff will get eaten next week, thanks to some poor planning. The big spending came on the cantaloupe, mushrooms, spinach, cilantro, avocado, and olives. But the salad I made with some of this stuff was delicious!


The dressing was sweet: olive oil and balsamic vinegar, and a little fig jam and some salt. Quite tasty. The filler was baby spinach, and the toppings included toasted walnuts, mozzarella, kalamata olives, avocado, tomato, and orange pepper. I guess I could put less stuff on my salads, and then they'd be quicker to make, but I just don't roll like that.

I don't have a photo, but I cooked up a chicken thigh to go with it - I recently had a lightbulb moment where I realized that if I rendered some of the fat out of chicken skin, and then stuck it in the oven, it would crisp up even better, and I was right. I highly recommend that approach! The rent-a-dogs loved cleaning up all that chicken fat out of the pan, too.

Spinach Quesadillas and beans


I had four corn tortillas left over from when I made tacos, and some cheese leftover from last week from the tomato tart that I haven't put up a recipe for. So, I turned that into quesadillas, served with some of those beans I had made, topped with some greek yogurt.


Quesadillas are easy to make. First, saute some garlic in olive oil. Once the kitchen smells like toasted garlic, add a whole bunch of spinach to the pan, and salt it. Spinach cooks way down, so depending on how much of it you want, you may want to add like four cups of it. Of course, if you just want enough for the quesadillas, just add two handfuls or so.

Next, grate cheese. I used cheddar. Grate lots of cheese.

If you have cilantro, that tastes good in these things too, so chop up some of that.

Once the spinach is done, pull it out of the pan, and add some more oil to the pan. Put down one tortilla, then add a bunch of cheese (probably half a cup?). Put some spinach over that. Then put on the second tortilla. This can all be done in the pan. Let it cook for 2-3 minutes, and then use a spatula and flip the whole thing. Once the looks thoroughly melted, pull it out and let it cool on a cutting board. Cook the other quesadilla while the first one cools. You want it to be relatively cooled before you cut it, or the cheese will just run out of it and it'll flatten. But you don't want it to be cold, because cold quesadillas are gross.


I decided that just eating cheese and corn tortillas for dinner wasn't very well rounded, so added some beans and greek yogurt, and the extra spinach. Pretty tasty.

Texas baked beans

I like beans. But I don't like normal baked beans, the Boston variety I suppose, because I don't particularly like the sweetness. I discovered that Texas baked beans aren't sweet, so I tried making some the other weekend, and they were awesome. I now plan to make a batch of beans every time I'm home, since Ed has the dutch oven, and slow cooking stuff works best in a dutch oven. Apparently, Texas baked beans recipes vary widely, with all sorts of spices and stuff that can go in the pot - it doesn't really seem to matter. As far as I could tell, based on the internet (which never lies), as long as you have beans, water, salt, pepper, and some sort of meat product, you're good to go. I was a little more elaborate than that, but not much.

Don't tell Ed, but I've been hacking off chunks of a giant rack of baby back ribs that he bought a couple weeks ago and stashed in the freezer. I've just been taking one rib at a time, if it weren't for the cut packaging, I'm sure he wouldn't notice... Back to the point, though, that entire rack of ribs cost $5.88. And if you're cooking one rib each week, well, that is a darn economical piece o' meat, especially as you're using the bone for flavor, too.


Right, recipe:

1lb beans (any kind will do, I used pinto this time)
soaking liquid from beans
more water as necessary
1 onion
4 cloves garlic
1 can diced or chunk tomatoes
1 beef rib, or other hunk of meat that will do well with slow cooking. A bone would work, too.
bacon grease, or oil - best yet, fry up some bacon first, then use the grease!
spices, in seed form (cumin and coriander for me) ** optional
spices, in ground form (more cumin, cayenne, more coriander, black pepper)
salt
1 bay leaf

The only dishes I used for these beans were a cutting board, knife, and dutch oven. Its a nice change from how I usually trash the kitchen, getting the maximal number of pots and pans dirty. If you don't have a dutch oven, you can use a crock pot, or just a regular pot and check it and stir it regularly - its more likely to burn things. The dutch oven has nice thick sides that hold heat well, so you can use a lower heat.

First, soak your beans for 6-8 hours (i.e. overnight), or do a quick soak - bring them to a boil, then let them sit for an hour.

Dice up an onion, and sweat it in some bacon grease. We always have bacon grease stored in a can in the freezer, its basically free, since you don't really feel like eating it with your bacon. And, it tastes delicious.

Once the onions are nice and sweaty, add the diced garlic. Let that toast for a bit, and then add any spice seeds you're planning to use - I find cumin leaves a nice flavor if you add it to the fat in the pan and let it pop open.

Dump everything else into the dutch oven. My beef rib was still frozen at this point.

Stir around the mixture so its all evenly distributed, and add enough water (or stock) so that you have full coverage, but don't make it too deep. This photo is showing liquid that is a bit too deep. Bring this to a boil, and once its there, reduce it to a simmer. Let it simmer for ~3 hours. Add the salt near the end, supposedly salt makes the bean skins tough if you add it too soon. But you don't really need to do anything, you can leave the house and just let it keep simmering away, with the lid on.

After 3 hours, it'll look something like this - most of the liquid will be gone/absorbed, the beans should be tender and delicious, and the meat should be mostly fallen off the rib - you can help it along with a fork. Discard the bay leaf and the rib bone, season with salt and spices the way you like it, and eat your beans. I like them with rice, some chopped cilantro, and a dollop or two of greek yogurt.

If there is still too much liquid after 3 hours, take off the lid and let it simmer away for another half hour or so, until the liquid is at a level you find acceptable. It should be pretty thick, and tasty.

Supposedly, and I have yet to test this, you can mash up the leftovers and it makes very tasty refried beans.

Tuesday, October 12, 2010

Chocolate Chocolate Chip Muffins

I suppose these are muffins, but they certainly have enough chocolate to qualify as a cupcake. Where is the line between cupcake and muffin, anyway? These are loosely based on a chocolate applesauce cake of Anna's, but then I tweaked stuff, for no good reason other than not having the full 1-1/3C applesauce. I put in regular chocolate chips and white chocolate chips, I think nuts would have been good, too, but I wanted to be able to share these with Ali on our way to Canada, and she can't do nuts, under penalty of death. So, no nuts.


Chocolate chocolate chip muffins
Made 12 huge muffins

1C white flour
1/2C whole wheat flour
1/3C cocoa (I used the special dark variety)
1C applesauce
1/3C oil
1/3C greek yogurt
1 egg
3/4C sugar
1/2C chocolate chips
1/2C white chocolate chips
1/2 tsp salt
1 tsp baking soda

Preheat oven to 350F. In a big bowl, mix the dry goods. In another bowl, mix together the wet stuff. Add wet to dry, and don't overmix. Line the muffin pan with muffin liners, or just grease each cup, and load 'em up. I found I had to fill the cups above the top, but they didn't explode or anything, they just made big muffins.

Bake for 20-25 minutes, until a testing stick comes out clean, and the top rebounds when you poke it with a finger. Don't overbake, because these guys are deliciously moist. And dark, holy cow that's a hit of chocolate.


Tuesday, October 5, 2010

Lunchbox muffins


Lunchbox muffins is sort of a silly name, nobody uses a lunchbox. I've used a plastic grocery bag for the last four years, maybe that counts as a lunchbox. Anyway, these are basically a redo of veggie muffins I made a long time ago. I remembered them being good, and I wanted to see what would happen when I added some greek yogurt. Basically, looking to get these have the right macronutrient ratio to eat as a meal. Although, you'll need like four at a time to get enough calories. Anyway, I came pretty close, thanks to the huge slug of protein the greek yogurt delivers. They also taste really good, but that's because you should never sacrifice taste in the name of "nutrition". The one problem was that these guys stuck to their wrappers, I probably should have greased them.

Lunchbox muffins
Made 15

1/2C white flour
1C whole wheat flour
1 tbs baking powder
1 tsp salt
1/2tsp flavoring - mix of black pepper, red pepper, dried herbs, whatever you like. I used a mix of peppers.
4 eggs
1/4C oil
1C nonfat greek yogurt
1C kale (packed down)
1/2-1C beet greens
1 onion
3 cloves garlic
~1/4C dried tomatoes
~3/4C shredded cheddar cheese
~3/4C shredded pecorino cheese (or other flavorful cheese)

The types of veggies and cheese are totally optional. Its basically 2-3C of chopped veggies, and 1.5C grated cheese.

Preheat your oven to 350F. In one bowl, mix the flours, baking powder, salt, and dried flavorings.

In a large bowl, mix the eggs and greek yogurt and oil. Chop all the vegetables super finely, and add them to the wet stuff. Add the cheeses to the dry mixture, and mix around until they're coated with flour. Add the wet to the dry, and stir to combine. It'll be super dry - I decided that was a good thing, because the veggies were uncooked, so they'd give off some moisture during baking.

Line the muffin tins with muffin tin liners, and spray those with something nonstick. Load 'em up high - they don't rise much on their own, so I just filled each tin as much as I feasibly could. As you can see from my blurry pictures, the muffin stays lumpy. Don't expect it to spread out.

I thought these were delicious, very definitely cheese-y and a bit spicy. They would not have passed the Ed-test, because Ed thinks muffins should be sweet, and preferably frosted. I'm not sure he realizes the difference between a muffin and a cupcake. Maybe he would eat these now, he certainly didn't eat the last ones, and still gets indignant that I put broccoli into a cupcake. Except, its not a cupcake. Sigh.

I added up the numbers, and each muffin is 153 calories. 8.5g fat, 12g carbs, and 8.5g protein. That's 22% of the muffin's calories coming from protein, making it just about a perfect snack/mini meal. If you eat like four of them. I just need bigger muffin tins. I bet sprinkling the cheese on top would be good, too, and might look nicer than having it hidden inside. Also, bacon would be good. That might get an Ed-approval, if I had bacon in the muffins.

Not the most attractive-looking muffin I've seen, but tasty enough to make up for it.

Wednesday, September 29, 2010

Tomato-bread salad


I have lots of delicious vegetables, and this is one of my favorite ways to eat them. The overall color is a bit pink, because of the beets, but it was a delicious salad. I recommend it. The quantities are all pretty relative, it just depends what you have on hand. I meant to put anchovies in it, but I forgot - I think that would make it taste even better.

Salad:
Makes enough to serve two as a side dish or one hungry person as a main dish

Chop everything roughly into cubes:

2 heirloom tomatoes
1 salad cucumber
1 red pepper or sunburst pepper
1/2 red onion
1 clove garlic
a whole bunch of cilantro, basil, or other fresh herbs
1 beet
1/2 avocado
two handfuls of croutons, preferably the homemade kind.

Dressing:
lemon juice
olive oil
salt

whisk to combine, taste, add whatever you think needs adding. I'd start with about half lemon juice and half olive oil, and go from there.

Croutons
Take a couple pieces of stale bread, or it doesn't have to be stale, that's just usually the way bread is when its not fresh out of the oven, cut into cubes, and toss with olive oil. Then bake for ~10 minutes in a 350F oven, until the croutons are crunchy on the outside.

Toss to combine, and eat immediately.

Tuesday, September 28, 2010

This week's plan

So, last week was under the budget, thanks to all the free grad student things. The freegan stars were aligned. This week, not so much, so I went down to Atkins Farm, by Holyoke college, to get my veggies, since someone had recommended it. From the outside it looks like the sort of place that will cost an arm and a leg, and maybe it would if you got sucked into buying the homemade baked goods and chocolate apples and other deliciousness, but I stayed strong, and only bought foods that were not for immediate consumption. They also have a fish counter and some local chicken and beef, as well as a very nice (if small) beer selection, so I would hazard a guess that I'll be back. I got out of there for just $17, but I had dropped $6 at the store over the weekend for eggs and tortillas and some other stuff, and after another $2 on tomatoes at Sunset Farm on my way home, I'm at my limit.

But I have such a bounty of beautiful vegetables! I'm psyched. Spent some time cooking this morning, and now I have some whole wheat rosemary rolls for munching on with my gazpacho soup and making into beet-goat cheese sandwiches. Should have taken a picture of that. Other things I'd like to make are a tomato tart, apple crisp, and some sort of tomato-bread salad. Hopefully Barry the basil plant is ready for me to harvest some of his leaves...

I have enough kale for a family of eight right now, so expect some more kale dishes soon. Although I might stick with the tried and true favorites - kale chips and kale and eggs. Maybe I'll try a kale salad, that would be seriously branching out.

Monday, September 27, 2010

7-layer dip tacos


I made some delicious baked beans (texas style, not sweet) over the weekend, and for lack of a desire to cook tonight, turned them into a mess of things on a plate sort of wrapped in tacos. I still have leftover pulled pork, so that went in there, plus an heirloom tomato, avocado, a ton of cilantro, an ear of corn, and a sunrise pepper. And some salt. I had just been to the farm stand, hence all the delicious veggies. It got messy fast, though, my corn tortillas are too dry to hold a taco shape, so the stuff fell out the bottom and out the ends. Hopeless. But delicious!

This made enough for four people, so, just take that as a warning. Or use half of each veggie.


The layering was: Pulled pork, beans, greek yogurt (tastes like sour cream, but better!), cilantro, tomatoes, avocado, corn, salt.