Friday, July 17, 2009
Buckwheat Scallion Pancakes
I've made scallion pancakes before, and they were good. I've made buckwheat crepes before, and they were good too. So I figured I'd merge the two. I made buckwheat scallion pancakes! I ended up baking them, just because its easier than standing there flipping things in hot oil in a pan (but not by much. neither technique is all that hard). The dough was pretty sticky to work with - I think that was the buckwheat, but it actually made it easier to roll the pancakes out.
I don't exactly remember the recipe - something along the lines of 1C water, 1/2C regular flour, and 1/2C buckwheat, and a whole bunch of scallions. Mix the flour and water together, and knead it until its smooth. I remember needing lots more flour to keep it from sticking. Divide the dough in two, roll it out flat like a pancake, and sprinkle with sesame oil and scallions. Roll it up like a cigar, and then roll it again like a rug. Roll out the rug to make a flat pancake, sprinkle with more sesame oil, salt, and red pepper flakes, and back for ~20min. Then cut it up and enjoy!
These weren't quite as flaky as the regular scallion pancakes, probably because the buckwheat sort of makes a batter rather than a dough. They were actually really good that way, though, since they were crunchy on the outside and chewy on the inside. And salty and spicy on the outside, too. Yum.
Next time, though, I think I'll keep the crepes and the regular pancakes separate, though. They were better on their own than mixed.
Friday, July 10, 2009
A sort-of Whitney Cake
Whitney cakes are the ultimate simple cakes. I probably have the recipe wrong, but its a Bullitt recipe, and its something along the lines of 1C flour, 1C sugar, and 1C liquids. I think the liquids are egg, milk, and butter, and there is probably some baking powder and salt too. I wanted to make a whitney cake, with some cherries, since I had some cherries and they weren't getting eaten fast enough, but then I made a half recipe, and I don't even know if its a real whitney cake since I just sort of made it up. I also didn't have any milk, so used yogurt, and I didn't feel like melting butter, so I used oil. But, it tasted delicious. I'll do this one again. I feel like it would work well with any fruit, so peaches are next...
Cherry Almond Cake
Made one small heart-shaped pan (~1.5 C batter?)
1/2C flour
1/3C sugar
1/8tsp salt
1 tsp baking powder
1 egg
2 tbs yogurt
2 tbs oil
1/2 tsp almond extract
~4 cherries, cut in half and pitted
Preheat the oven to 350F.
Put the sugar, flour, salt, and baking powder in a bowl. Mix it all together. In a separate bowl, mix together the egg, yogurt, oil, and almond. Add the dry to the wet, and stir it around just until its mixed. Pour into a well-greased pan, in my case I used a small heart-shaped pan. This isn't much batter. It makes a thin layer.
Cut the cherries in half and remove the pits. Artfully arrange them cut-side down on the top of the cake batter. Bake the cake for 15-20 minutes, start checking it after 15 minutes.
I hesitate to say this serves more than one...
Wednesday, July 8, 2009
Everything soup
Ed made a soup, and it was delicious, so I took pictures. As with most Ed-recipes, who knows what the recipe actually is. Hopefully I'll be able to get you close, though. Basically, we fried a bunch of things, and then added them to the hot soup of noodles and dashi and daikon. It might not sound glamorous, but it was tasty, and relatively cheap as far as our fancy meals go.
The fried things on top were tofu, spicy red peppers (the long skinny kind, but not the thai red peppers, these were pretty smooth-skinned), and oyster mushrooms. We put them in a pretty dish, which precipitated me taking pictures and putting this on a blog. The soup broth was entirely dashi, which is little pellets of tuna, with some julianed daikon, a little kale, and egg noodles. We happen to have dashi because Ed discovered that you can get a giant box of it at the super88, and it goes really well as a broth for cold soba noodles. I'll do my best with a recipe...
Asian-flavored everything soup
Makes approximately 4 servings
1 bunch of fresh egg noodles (about half a pound to a pound? the measurement doesn't matter too much)
3/4 daikon root, julianned
4-6C water
3 tbs of dashi (look at the instructions on the package)
~1C kale, chopped finely
~9oz firm tofu
~2C cooking oil
2 long skinny smooth-skinned red peppers, sliced crosswise into little pieces
~4C oyster mushrooms, chopped coarsely
~4 tbs butter
Salt
First, you need to press the tofu. If it comes in a block, the way ours does, slice it into thirds, and place it on a dish towel. Fold the dish towel over the top of the tofu and put a cutting board or something else thats big and flat on top. Then add a couple cookbooks, maybe 15 pounds worth of weight, and let it sit for 20-30 minutes.
Start cooking your mushrooms, because they take a while. Salt them liberally, and add 2-3 tbs of butter to a pan. Cook the mushrooms on medium high for about 20 minutes, adding butter as needed, until they're nice and crispy. Don't be afraid of the salt, a lot of it gets used to draw the water out of the mushrooms.
Meanwhile, put about an inch of oil into a wok or other big pot. Get the oil hot by putting it on high heat, and before it starts smoking, turn it down. Add the pepper slices, and toss them around just until they're cooked - you don't want them to turn brown. Take them out of the oil and set them on a paper-towel-covered plate to drain. Don't skip this step, the deep-fried peppers are really awesome. It kind of takes away some of the heat so you can actually taste pepper-ness. Its good. I was able to taste the peppers once they were cooked without running to the fridge for a glass of cream.
Take the books off the tofu, and slice it into bite-sized pieces. Add the tofu to the oil, turning up the heat as you add the tofu, and then turning it down a little once its back up to heat. You sort of have to just use your intuition on this one. Stir around the tofu once or twice so it doesn't stick, and take it out when its golden brown and crispy looking. Add it to the paper-towel-covered-plate.
Your mushrooms will be close to done by now, so set a pot of water on to boil, with the dashi and the daikon and kale. Once the water is boiling, these things are mostly done, so you can add the noodles, which cook really quickly since they're fresh. Taste them after a minute, you want to take the soup off the heat while the noodles are still pretty chewy, so that they don't turn to mush.
Serve the soup in a bowl, with the crunchy things sprinkled on top. Enjoy!
Tuesday, July 7, 2009
Lemon-Ginger Muffins
I've been meaning to try out Dorie Greenspan's lemon yogurt cake for a while now, and eventually I realized that unless I turned it into muffins it just wouldn't get made. The reasoning behind this is that muffins can be sort of construed as health food that I will eat while (or after) training, but cake disappears a little more slowly and with a lot more guilt. Not having an office to bring baked goods in to is going to really limit my dessert-baking. Anyway, I love the combination of lemon and ginger, and I happened to have some crystallized ginger just waiting to get used up. I also happened to have a zip lock bag with 3/4C of sugar and 1/4 tsp of salt, that I was going to use to make a quart of koolaid to drink while riding, but then I realized that that is way too much salt, and the koolaid would taste disgusting. Sort of a tangent, but I didn't want to just throw out that much sugar, so I figured I'd make a recipe for lemon ginger muffins that used 1/4 tsp of salt and 3/4C of sugar. Dorie's recipe calls for a full cup of sugar, but I figured that if I was turning the cake into muffins, I would want them to be a little less sweet and a little less rich than a cake. So, 3/4C of sugar would be perfect. I also reduced the oil, to no discernably bad effect.
Lemon Ginger Muffins
Makes 12 muffins. Inspired by Dorie Greenspan's Lemon Yogurt Cake
1C white flour
1/2C white whole wheat flour
2 tsp baking powder
1/4 tsp salt
3/4C sugar
3 eggs
1/4 tsp vanilla
1/4 tsp lemon extract
Zest from one lemon (or more, if you like lemony things)
3/4C yogurt (I used 1%)
2 tbs oil
1" cube of fresh ginger, minced (optional)
1/2C crystalized ginger, diced
Preheat the oven to 400F. Grease a muffin tin. In a large bowl, combine the sugar and lemon zest and rub it around with your fingertips until the sugar is moist and smells deliciously lemony. I could have gone for the zest from 2-3 lemons, honestly, but it was lemony enough with just one lemon. Add the eggs, yogurt, vanilla, fresh ginger, lemon extract, and oil to the sugar, and stir until the mixture is smooth. Dump the flours, baking powder, and salt in a big pile on top of the wet stuff - gently stir together the dry stuff on top of the wet, without letting it get too wet. This is my method of not getting another bowl dirty, I do it frequently with cookie dough. If you have a dishwasher, or enjoy doing dishes, go ahead and combine the dry ingredients in a separate bowl. Fold the dry into the wet, only folding enough to barely moisten things.
Fold the crystalized ginger into the batter, divide it into muffin tins (I filled mine completely to the top, and it all worked out), and pop that sucker into the oven. Once the muffins are in the oven, turn the heat down to 350. The idea behind putting them into a hot oven is that they'll rise higher. Bake for 30 minutes, then check for doneness with a toothpick. Keep baking if they're not done.
Oh, I also sprinkled my muffins with coarse sugar, which gave the tops a nice crunch. I recommend that step.
The muffins stayed moist and delicious for four days, although they're definitely best right out of the oven. The ginger flavor was more pronounced the longer they sat out.
This recipe is a definite keeper. And a do-over-and-over-er.
Wednesday, July 1, 2009
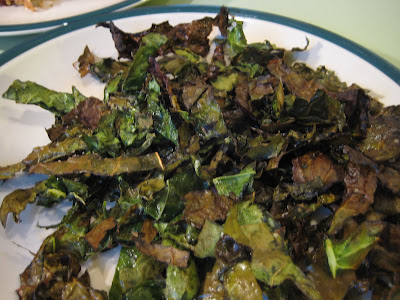
Kale chips
I admit, this is essentially a re-posting of a recipe. However, one of the three ingredients is slightly different. I make crunchy kale a lot, with curly leafed kale, and the other day, I bought some flat-leaved kale. It has all sorts of other names, like Tuscan kale, dinosaur kale, whatever, it has flat leaves. We had it twice in a row, the first time we left it in big leaves, and that was basically impossible to eat. So the second time, I chopped it up into bite-sized pieces first, and then I tossed it with olive oil and salt and baked it, and it was awesome. I think this method of cooking works better with the Tuscan kale than with the curly-leaved kale, because it crisps up while staying green, unlike the curly kale which tends to be either green or crispy. It just turns slightly brown. This stuff was good though. I'll be getting this kind of kale in the future - provided it stays as cheap as the other kind.
Kale chips
1 bunch of flat-leaved (Tuscan) kale
~1-2 tbs olive oil
sprinkling of salt
Preheat your oven to 350F. Take the kale leaves off their stems, rinse them, and chop them into bite-sized pieces. Toss these pieces with olive oil in a bowl - don't use too much olive oil, I found that these had a tendency to feel oily the first time we made them (when we used much more olive oil). Sprinkle some kosher salt on the leaves, toss that around, and then spread them in a loose layer in 2-3 baking sheets. Bake for 7-15 minutes. You should hear them crackling as the water dries up. Take them out after 8 minutes or so, just to check the progress and maybe stir them around. They're done once they feel crispy - not floppy anymore.
Enjoy!
Subscribe to:
Posts (Atom)