Monday, February 28, 2011

Chocolate Mousse


I've eaten my fair share of chocolate mousse, but I'd never actually made it on my own before. We were wandering the aisles of the Londonderry IGA, wondering what to make for dinner, and Ed suggested chocolate mousse for dessert. Sounds good! Neither of us knew what went into it, but we figured chocolate chips and cream would be a good start. Turns out all you really need is chocolate and eggs, but we whipped some cream to put on top, anyway. Luckily, there is a cookbook at the Upper Camp (from like 1950), which, while having useful recipes for things like chocolate mousse, also has recipes for things that include jello, and recipes for "exotic" salads, basically that means anything that isn't iceberg lettuce. At least it wasn't like the 1001 Muffins book, which has recipes for liver-and-onions-muffins, fudge-sauerkraut-muffins, and lettuce-muffins. Why oh why would you want to make a lettuce muffin? I think I need to try some of these recipes, just to see how they turn out...

I think it was a Good Housekeeping cookbook, either way, what I can remember of the recipe is below.

Chocolate Mousse
Made enough for three, although we divided it between the two of us

1/2C semisweet chocolate chips
3 eggs, divided
1 tsp vanilla
Heavy cream for whipping, for topping, if you want.


Divide the eggs, and whip the whites to stiff peaks. I used a hand beater thing. An electric one would have been easier.

Melt the chocolate chips. You can either do this over a double boiler, or in the microwave. I used the microwave, the trick is to take the chocolate chips out of the microwave when they're still shiny, but not yet melted. Then you stir them around, until they melt. Add the egg yolks to the chocolate all at once, and stir vigorously. Add the vanilla. I think espresso powder would be wonderful here, too, but we didn't have any.

Fold the egg whites into the chocolate. I generally do this in three installations - the first third of the egg whites, I just stir into the chocolate, to lighten it up. The next third, I fold in, and the last third, I fold in.

Using a rubber spatula, pour the mousse into serving dishes. I was able to fit it all in two wine glasses, but 3-4 of them would be ideal.

Supposedly, you have to chill the mousse for 4 hours in the fridge. I stuck it in the freezer for about 30 minutes, and then removed it to the fridge while we were eating dinner, so it wouldn't be frozen. Although frozen mousse wouldn't be so bad. Top with whipped cream, and serve. The freezer-method seemed to work just fine, because the mousse was delicious. I suppose you should be worried about where you get your eggs for stuff like this, but so far so good, no salmonella.

Wednesday, February 16, 2011

Butternut squash soup

This is a fairly straight-forward soup recipe, but what really makes it are all the delectable toppings. The soup is fine without them, but better with. This got a good Ed-rating, for anyone who was wondering.

First, roast the squash. I peeled it afterward, you could peel it before, it doesn't really matter. I chopped my squash into chunks, tossed with olive oil, sprinkled on some sliced onions and chopped sage leaves, and roasted about 15min at 400F.


Then I put it in a pot, with some good chicken broth. I happened to have made the broth recently - chicken bones, carrots, celery, onion, bay leaves, rosemary, and garlic, all boiled down for a few hours. Home made broth is nice and all, but you could have used boullion and water. Add enough liquid that you've almost covered the chunks of squash, but there are still some chunks sticking up.

I added a rind of parmesan cheese at this point - we happened to have one hanging out in the freezer. I also peeled and chopped 1/4 of a granny smith apple, and put that in there, along with a couple chunks of fresh ginger. I recommend a bay leaf, too.

Simmer the soup for a while, maybe 20-30 more minutes. Remove the parmesan rind (unless it dissolved completely and you can't find it), and then blend the soup. I used a stick blender. Less stuff to wash. Pour in a tablespoon or so of cream, and stir that in. Serve in bowls. You could grate some more parmesan cheese on top, if you wanted.

All the stuff on top made it even more delicious. The glob of which stuff in the middle is greek yogurt - I'm not sure I'd do that again, it was a bit too tangy. But the caramelized onions, and oyster mushrooms fried up in butter until they're crunchy, and cream, those are all very necessary additions.

Tuesday, February 15, 2011

Chocolate covered strawberries

Every year on my birthday, I buy strawberries. Having a birthday in February means I feel a little silly buying my favorite fruit in the middle of winter, but I figure, its my birthday, I can buy strawberries if I want. I don't know if I have a healthy relationship with buying food... I like to eat it, but not to spend money on it. Anyway, I have strawberries, and I have been enjoying them. Since it's my birthday, and I'm in Amherst but Ed's in Boston, he suggested that I bake myself a cake. That seemed like far too much work, but chocolate-covered strawberries was just the right amount of work. And far more delicious than a cake, anyway. It's true, there is a way to improve strawberries - dip them in good chocolate!


This took about five minutes, start to finish, thanks to a microwave. I used some of the KAF burgundy chocolate chunks, about a third of a cup, and put them into a pyrex measuring cup. I think in the future, a wider bowl would be better. Anyway, I microwaved the chocolate for one minute, but it wasn't starting to melt yet, so I did another 15 seconds. After that, I could stir it around, and it was beginning to melt, but it took another 15 seconds to really get gooey.

The strawberries were washed and dried and sitting on a towel ready for use. Since I didn't have any wax paper, I buttered a plate, and used that. I had meant to only dip 7 strawberries (I'm just one person, after all), but I had enough chocolate to do 12. And you can't let good chocolate go to waste!


Once the chocolate was all gooey, I stirred it up with a spoon some more, then removed the spoon, and commenced dipping.


The dipping was a fairly messy process, and involved a lot of finger-licking. I found if I rolled the strawberry through the chocolate, that worked best, although near the end, I was just using my index finger to paint the chocolate onto the berry.

After dipping, I put them on the plate, and the chocolate had hardened up pretty well before I was even done dipping the last berries. I've heard you can put them in the fridge, but clearly the house was cold enough they didn't need it.


End result: perfection. The perfect mix of sweet and bitter and sour, chewy and crunchy and soft and toothy. So good. So worth it. Happy birthday, me.

Lemon Garlic Green Beans

Let's pretend you had some leftover, frozen, butternut squash gnocchi in your freezer from the fall. If you happened to also have butter, fresh sage, an oyster mushroom, and some salt, I'd highly recommend chopping that mushroom, frying it in a healthy glob of butter with a pinch or two of kosher salt until its just brown, adding some sage leaves, frying those up until they're starting to get crunchy, adding more butter, dumping in the cooked gnocchi, stirring it all around, and serving it with a dash of freshly grated parmesan cheese. If you did all those things, you'd probably have a darn tasty meal sitting in front of you. Just sayin'.

Clearly, a dish like that needs a side, preferably a green one. I had some green beans, and I wasn't entirely sure how I wanted to cook them, but I had recently had some of the lemon-garlic olives from Whole Foods, and those are tasty, so I decided to make lemon-garlic green beans. Not quite the same as olives, but hey, they were still pretty good. No photo, and no Ed-rating, but I'm guessing he'd like these.

Lemon Garlic Green Beans
Makes however much you'd like
Green beans, of some amount - they don't really cook down, so just pick out as many as you'd like to eat.
1 lemon
3 cloves garlic
olive oil
salt

Heat the olive oil in a pan over medium-ish heat. Chop the garlic finely. When the oil is hot, add the garlic, stir it around, and then add the green beans. Sprinkle with some kosher salt. Slice the lemon into 4-6 round slices, and place those on top of the beans, mashing them a bit with a wooden spoon so they start to give out juice. Let the beans sit without moving them for a few minutes, then stir everything around, and let it sit for another couple of minutes. Taste a bean every once and a while. Once they taste as cooked as you want them, pull them off the heat. Discard the lemons and garlic pieces, just eat the green beans. They were delicious like that.

Monday, February 14, 2011

Creamed spinach


I've never actually had creamed spinach before, but Ed wanted to make some, after seeing an Iron Chef episode where they made creamed spinach with gruyere. I think it was battle gruyere, because he was talking about cheese a lot. This was another Monday-night bribe, as I came home from coaching to various projects all over the kitchen. The plan was for the creamed spinach to be the base of the dish, with a poached egg on top, and then a little gruyere cracker thing on top (that's where you can tell it was from Iron Chef - what normal person makes cheesy tuile things?).

Unfortunately, he put me in charge of the gruyere tuiles, after telling me to turn the oven to broil, and I forgot about them. Then I smelled burning, opened the oven door, and was greeted by flames. Oops. So, no gruyere tuiles.

The creamed spinach, however, was delicious, with or without its fancy bits. Being an Ed-recipe, quantities are approximate, but, this was delicious.

Creamed spinach
Made enough for two large bowls, big sides

1 bunch of fresh spinach, rinsed and dried
4 pieces bacon (Ed used black forest)
1 clump oyster mushroom
~2-4tbs heavy cream
~1/4-1/2C grated gruyere cheese

Chop up the bacon and mushroom into very small pieces, and cook it until the bacon has rendered out all its fat and the mushrooms are cooked.

Blanch the spinach for about a minute, then pull it out and chop it up as finely as you can. Add it back to the mushrooms and bacon in the pan. Mix it around. Add some cream. Stir things around. Our spinach was still pretty green, not that creamy. Add in the cheese. Stir around some more, until the cheese melts. Add more cream if you feel you need that. Put the whole mess in a blender, and blend for a bit, until it looks more like gloop.

Serve. You can sprinkle cheese on top for more deliciousness. Ed served this with a poached egg on top, and while that was tasty, the spinach on its own was delicious. This is crazy, because I never thought I liked creamed spinach, but I don't think I've ever had it before, either. Just goes to show, you can't know you won't like something until you try it...

Friday, February 11, 2011

Bribes


The other week, I had said something about wanting to leave Monday night (instead of Tuesday morning) for Amherst, to avoid the snowstorm on Tuesday. I went off to coach, and when I came home, Ed was in the process of cooking a steak tenderloin, mushroom risotto, and opening a bottle of wine from when we were last in France. Needless to say, I stayed home that night! What a bribe =)

This makes me start drooling. The risotto was a regular sort of risotto, with oyster mushrooms and shitakes in it, and then some oysters and black trumpets fried in butter until they're crunchy, and sprinkled on top of the risotto. Oh man, I just started drooling again.

We also had a very tasty salad, with a cilantro-ginger-lime vinaigrette. The vinaigrette is the only real recipe from that night...


Cilantro-ginger-lime vinaigrette
About a handful of fresh cilantro, rinsed
~1" cube of fresh ginger, peeled
1 lime, its zest and juice
olive oil
lemon juice, to taste
salt, to taste

In a food processor, combine everything. Process that up, until it makes a smooth dressing. Taste it. Add more salt, lemon juice, or olive oil, as needed.

Thursday, February 10, 2011

Potato-kale pancakes


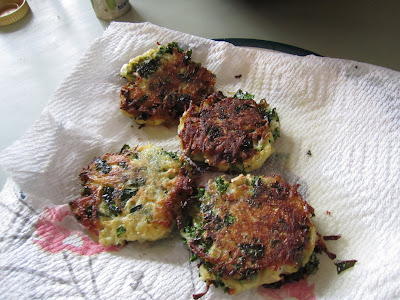
This was a bit spur-of-the-moment, but, I wanted something hot for lunch, and I had kale and a potato to work with. Any time you fry something in a quarter inch of oil, it'll get my approval, anyway. And the Ed-stamp of approval. These were quite tasty.

1 potato, shredded
2 leaves of kale, rinsed, dried, and chopped into teeny little pieces
~1/2C shredded parmesan cheese
1 egg
cooking oil
salt and pepper

Grate your potato, and squeeze out the water. Then put it in a bowl. Add the kale, cheese, egg, and maybe 1/4tsp of salt and a couple grinds of pepper. Mix that around until its homogenous.

Heat a generous layer of cooking oil in a frying pan - the cast iron pan worked well for this. Once the oil is shimmering, use your hands to roll out hand-sized balls of the glop, and put it down in the oil. You'll have to work the potato stuff a bit with your hands, first, so that it all stays together, but it should stay. Once the balls of potato mixture are in the pan, flatten them a bit with a spatula.


Let the patties sit still for about three minutes, and they should be sitting there sizzling away. Once the bottoms are browned, flip, and shake some table salt on top of the side that just got flipped. Squish the patties with a spatula once you've flipped the patties.


After another 2-3 minutes, when that side is also browned, pull the patties out of the pan, and drain on a paper towel for a second before serving. Repeat the frying as necessary, I ended up with five patties. These are quite good, but if you fry up anything as little pancakes, and make it crunchy, and put cheese in it, well, I'll like it. The kale was a tasty addition though.

Wednesday, February 9, 2011

Filled cherry scones


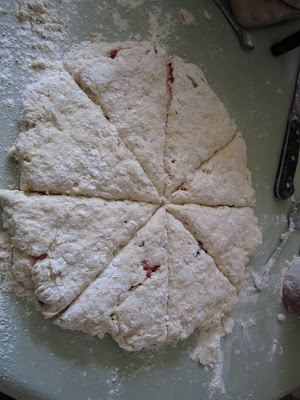
I decided to try something other than the standard Alton Brown scone/biscuit recipe, and I tried the King Arthur Flour one, from another one of my favorite baking cookbooks. I hate to admit this, but this was the first KAF recipe I ever tried that failed. Luckily, it was just a texture fail, and I was able to rescue the batch of scones. They ended up tasting delicious, and in Ed's words, "these are delicious". So, its worth trying them, but with the modified recipe, not the original one. The filled bit comes from the final step - instead of just making a circle of dough and cutting out wedges, I made two circles, spread cherry preserves on top of the lower circle, and put the other circle of dough one top. Then I cut the wedges. Success!

Filled cherry scones
Made 16 large scones

2C white flour
1C whole wheat flour
1tbs baking powder
1/2tsp baking soda
1/4tsp salt
1/4C sugar
1 1/2C buttermilk (original recipe asked for 1 1/4C, which wasn't nearly enough, and I added another half cup, which was a bit too much)
1/2tsp almond extract
4tbs butter, frozen
~1/2C cherry preserves, or other jam

Preheat your oven to 450F.

Mix together the flours, baking powder, soda, salt, and sugar. Use a cheese grater to grate the butter into the mixture. Use your fingertips to rub the butter into the flour for 37 seconds. Dump in the buttermilk and almond extract, and stir just until the mixture comes together. It'll still be pretty sticky.

Flour a work surface, and dump out the dough into two equal-sized balls. Smoosh them down with your fingers until they make equally-sized discs, and spread jam on one of the circles. Careful to not overwork the dough - just sort of squish it into a circular form. Move the second circle onto the first, so that you have dough - jam - dough. you can squash that out a little wider now that its filled.


Using a sharp knife, cut the dough into 16 pieces, however you'd like. If the dough is sticking to the knife, feel free to flour it occasionally.

Carefully transfer the scones to a greased baking sheet (or two). Turn the oven down to 400, and bake for 20 minutes, until they're golden brown on top. Don't eat them all at once when they come out of the oven... you'll get a stomach-ache.

Tuesday, February 8, 2011

Biscuits


Biscuits are delicious. This is Alton Brown's buttermilk biscuit recipe, from his book I'm just here for more food. Make these, they have a high Ed-rating, and are quite delicious. Also, you can have them in the oven in 10 minutes. And out of the oven in another 15.

2C flour
4tbs baking powder
1/4tsp baking soda
3/4tsp salt
1C buttermilk
1/2 stick butter, frozen

Mix all the dry stuff together. Use a cheese grater to grate the butter into the dry stuff. Use your fingertip to rub the butter into the flour for all of 37 seconds. Dump in the buttermilk, and mix just enough to combine. I sort of fold it, usually.

Now comes the tricky part. The recipes all say to knead the biscuits and then cut them into shapes, but I've always just made plops of dough. I decided to try both. In the end, I think I prefer the kind that is just dropped onto the baking sheet, because they are crispier, and I like the shaggy look. The kneaded/folded ones were too much like a dinner roll. Still light and flaky, but just less delicious.

Bake 15-20min at 400F.


Regardless of whether they're lumpy or smooth, biscuits are delicious straight out of the oven. I think that plate is biscuits is basically all I ate that day...

Wednesday, February 2, 2011

Raspberry chocolate oatmeal muffins


I wanted to make muffins, and I was thinking of making blueberry oatmeal muffins, because I'd remembered them being awesome. However, I didn't have any blueberries, and I wanted to put chocolate into the muffins. I solved problem number one by walking down to the corner store (a much faster prospect than digging out my car and attempting to get out of the driveway), but all they had by way of frozen fruit was raspberries. For $7. Yikes. But, I haven't bought any food yet this week and it's already Wednesday, so I felt like it would be ok to splurge on frozen raspberries. It was a big bag, anyway.

I walked back home with the raspberries (and milk. I'd needed milk, too.), and looked up some recipes for raspberry oatmeal muffins, and everything kept pointing back to this person's muffin recipe. I figured if enough other people liked her recipe, I'd follow it, too. The big difference between her muffins and the kinds I usually make is that she was making a butter muffin instead of an oil muffin. I find butter to be too many extra steps, but at least this recipe was just melting it, as opposed to creaming it or some other labor-intensive process. The end result was delicious, but raspberries and chocolate are a match made in heaven, so I was sort of expecting deliciousness. Its not a very sweet muffin, but again, the raspberries and chocolate take care of that. I've posted the recipe below, but I followed the original one almost exactly. Almost. I am incapable of following a recipe as it's given to me...

Raspberry chocolate oatmeal muffins
Made 12 big muffins

1 egg
1/2 tsp vanilla extract
1/4C sugar
1/2C (1 stick) butter, melted
1C milk
1C rolled oats (not quick oats)
1tsp lemon juice
1/2C white flour + 2 tbs white flour
1/2C whole wheat flour
1/2tsp salt
1tsp baking powder
1/2tsp baking soda
some cinnamon
1C frozen raspberries
1/2C chocolate chunks

Combine the oats and milk and lemon juice in a bowl, and let it sit. The original recipe said let it sit 1hr, I got impatient at 30min, and that was just fine. Buttermilk is an acceptable substitute for milk+lemon juice (which should be vinegar, anyway, but I didn't have any).

Preheat your oven to 375F.

Melt the butter.

Put the egg, vanilla, sugar, and butter into the bowl with the milk and the oats. Stir that around thoroughly. Dump all the dry goods (flour, salt, baking soda, baking powder) on top, and mix those around lightly so they're uniform before you fold them in to the wet stuff. Add the raspberries and chocolate, and fold that into the batter. Don't overmix things.

Put the batter into lined muffin tins, and bake for 25-30min. I think mine took just about 30min, the raspberries add a lot of moisture. The muffin tops will be golden brown, and spring back when you poke them, when they're done. Remove to a cooling rack, and enjoy!


The muffins were really crumbly, but, moist and delicious at the same time, if you can get your head around that. Mostly, they were just awesomely raspberry-y and chocolate-y, which is what I was going for.

Pitas

After our lettuce pitas the night before, I decided to make some actual pitas for lunch, so we could put our leftovers from last night into fresh pitas. I followed this recipe, and it worked beautifully. Didn't take too long, either, which was nice.


Pitas
3C flour
1.5tsp salt
1 tbs sugar
1 tbs yeast
1 1/3C warm water
2 tbs olive oil

Put the warm water in a bowl, add your yeast and sugar, and let it sit for five minutes or so to proof the yeast. Then dump in everything else, stir it until its mixed, and dump that lot onto a floured table or some other surface for kneading. Flour your hands, and knead the dough for 5-10 minutes continuously. I set a kitchen timer for that sort of thing. When you're done, the dough should feel wonderfully elastic and stretchy, and smooth.

Grease a bowl, and let the dough rise somewhere warm (mine went near a radiator) for an hour. The original recipe called for longer, but I was hungry. The dough should have doubled in bulk by then, if not, let it keep rising for a while. Once it's doubled in bulk, dump it back onto that floured surface, and cut it into 8 pieces with a knife. Roll each piece into a round ball, and let those sit while you pre-heat the oven to 400F.


Once the oven is warm, roll out the first ball into a flat pizza shape. Don't roll it too thin, just pretty thin. Put one to two pitas on a baking sheet at a time, and bake for 5-8 minutes, until they're really poofed up.
You don't want them to get too brown, because then they'll be crispy instead of soft and pliable.

Let them cool for a little bit, and then cut them in half and proceed to stuff them with things. Here we have leftovers from the lettuce pitas from last night. Quite tasty. Although according to Ed, I overstuff my pitas.


Ed's version of a pita. Not nearly enough stuff inside.

Tuesday, February 1, 2011

Lettuce pitas

Ed is admonishing me to post more recipes more often, since I keep taking photos of things but not doing anything with them. I'll try to upload some of our yummy meals in the next few days. I've sort of given up on the whole tasty-healthy-cheap idea for now - not that everything I cook isn't at least one of those adjectives, and often two, but given that I'm only in Amherst for two nights a week, I'm not buying food for myself as often. Mostly, I steal food from our fridge at home, and brave Ed's wrath when he discovers all the kale has gone missing out of the fridge. At least I don't take his beer...

Anyway, Ed had gone to Russos and gotten lots of veggies, but he called me up as I was driving home from Amherst and asked me to pick up something bloody from the store. I stopped by Whole Foods, because they have yogurt pretzels in the bulk section (not that I'd ever sample from the bulk section), and they had some top round (I think?) that was relatively cheap and looked pretty good. I want to say it was around $5/lb, which puts it on par with hamburger when you're looking at the WF meat case. Anyway, half a pound of that went pretty far, since we ended up slicing it.
*drool*

We both decided pitas would be just the thing, but, we had neither pitas nor the patience to make some. So, we made lettuce pitas, and that worked out pretty well. Sort of interesting, but very tasty, and pretty healthy too.

The stuff for inside: steak (boy is that cooked perfectly), tomatoes, onions, mushrooms, and a sort-of-tzatziki sauce that Ed had made a day or two before.

The tzatziki is the only real recipe, and being an Ed-recipe, all quantities are approximate...
Combine: greek yogurt, diced feta cheese, diced cucumber, lemon juice, olive oil, salt, and pepper. I think that is more or less in descending order of quantities, but just keep tasting it until it tastes tangy and creamy and salty and delicious.

The mushrooms are giant oyster mushrooms (we get them from Russos - they're like $3.98/lb, which is actually the same price as the white button mushrooms, and they taste way better. Score!), sauteed in butter and kosher salt. The onions have just been sliced and cooked for a while until they're just starting to caramelize.

Lay your stuff on the fatter end of the lettuce leaf, and try not to over-stuff, because lettuce breaks. Cabbage might have been better, but we only had redleaf lettuce.

Roll it up, attempt to seal it shut, and eat!