Saturday, May 29, 2010

Chocolate tofu mousse


We bought some soft tofu the other day, wanted to try it in a salad dressing. I think we'd meant to buy silken tofu, but that only came in ginormous containers, and the soft tofu came in smaller containers. So, soft tofu it was. It made an ok salad dressing, nothing special, but then we had a whole bunch (a block and a half, I think 9oz blocks?) left over. Apparently, soft tofu makes a good chocolate pudding, so I tried out a recipe for chocolate tofu mousse I found on the interwebs. It was actually quite good, maybe that has to do with how much chocolate I added, but it got pretty solid once it chilled. Even Ed liked it, although we agreed that to call itself mousse, it would have to be a little fluffier. The other issue was that because it was soft tofu, the food processor didn't quite do the trick in completely pureeing the tofu, so there were a couple little bits of tofu skin in there. They weren't bad, just... interesting.

The following recipe is about what I put in - I think the overall ingredients are the same as whatever recipe I'd found online, but the amounts are from our version.

Chocolate Tofu Mousse
Serves 4

1 block of tofu (~9oz)
~1/4C chocolate chips (two handfuls)
3 squares Ghiradelli 100% dark baking chocolate
1-2 tbs maple syrup
1/2 tsp vanilla extract
dash of salt
Strawberries or raspberries for serving

In a food processor, puree the tofu. Put the tofu in a saucepan, and add everything else. Heat on medium-low heat until the chocolate dissolves. This makes a very dark chocolate flavor, if you prefer more milk chocolate or less bitter, add more maple syrup and less dark chocolate, or more chocolate chips. You could do this with only chocolate chips, but we happened to have dark chocolate.

Once the chocolate is melted, stir it around, and then chill until you're ready to serve it. It will solidify quite a bit.

Put it all in the saucepan.

Melt.

Ed and I have different opinions on chocolate - for him, the darker, the better. I like milk chocolate. This was a very dark-chocolate-tasting dessert, so he really liked it. I thought it should have been sweeter. He thought we needed to add some espresso powder, which actually would have been quite nice. But with more sweetness. Either way, taste it often as you melt the chocolate to determine how chocolate-y you want your dessert. The bitter flavor of dark chocolate went really well with strawberries. Raspberries would work well, too. I might have to make more of this stuff with the rest of our soft tofu...

Thursday, May 27, 2010

Sardines and avocados


This sounds like a really weird combination. It is a pretty weird combination, and I was certainly skeptical the first time I tried it. I've put anchovies in a tomato sauce for pasta before, though, and that was sort of like the entry drug, I guess. Ed and I watch Good Eats occasionally, although without a tv its not a regular occurrence, and we saw one where Alton Brown made an appetizer thing of sardines on mushed-up avocado on toast. It looked really good. I don't know why. Sardines don't normally strike me as something that would taste really good, in fact, they sort of gross me out. They're all fishy and mashed up together in a can and packed in olive oil and they smell kind of fishy. But, we trust Alton Brown, we've liked most of the recipes of his that we've tried.

The first time we tried this, Ed bought anchovies instead, and since those held their shape as little fishies, they were kind of cute - I ate them and I was pleasantly surprised. Since then its been sardines, and they mash up really nicely into a vinaigrette, which makes them taste good. Amazingly enough.

So, after taking that first bite and realizing how good the salty, tangy, slightly fishy, sardines mix with the creamy avocado and crunchy toast, we were both hooked. This is a darn good way to eat sardines. Why should you eat sardines? Meh, there are health reasons, but mostly, this tastes better than just eating straight avocado, as sacrilegious as that sounds. And sardines are cheap. The original recipe calls for sherry vinegar, which we don't have, so we've been using lemon juice. Alton's recipe calls for actually marinating the sardines, which is way too long a process, we tend to make this as an appetizer, so marinating is out. Just mix everything together, put it on the toast, and eat it. Our quicker version of this recipe is below. It may sound weird, but it is totally worth trying.

Toast with sardines and avocados
Serves 4 as an appetizer, 1 as a dinner...

1 can (4.5oz) of sardines, or anchovies, or any other small canned fish, packed in oil
1 lemon
salt and pepper to taste
1 avocado
french bread, in slices (~10-15 slices)
cilantro or parsley (optional), chopped super finely

Drain the oil from the sardines into a bowl. Whisk with the juice of the lemon and the salt and pepper and cilantro, and then toss the sardines with the vinaigrette.
They look sort of gross, for sure.


Meanwhile, brush some olive oil on either sides of your slices of bread and toast them in the oven until they're just crispy.

Mash up the avocado roughly with a fork, you can do this in its skin.

Spread it on the bread, I like a thick layer, Ed likes a thinner layer.

Put the sardines on top of the avocado, and enjoy right then and there! Weird, but delicious.

Wednesday, May 26, 2010

Lime polenta yogurt cake


Yogurt cakes are awesome. I was going to make a lemon one, but I happened to have two limes, so I went with that, and deliciousness ensued. I had some whole milk yogurt left over from something, so I had already decided to put it into a cake, sort of like this one, but naturally I got distracted and made something different. I used a pretty coarse grain of corn meal here, and it made it deliciously textured. Worth trying. And the lime just brightens everything up, and the glaze keeps it moist.

1C flour
1/2C cornmeal - the coarser the better
3 eggs
1/2C oil
1/2C yogurt
3/4C sugar
zest of 1 lime (2 limes if you really like limey stuff. I used two)
1/2tsp salt
1/4C powdered sugar, for glaze
lime juice, for glaze

Preheat your oven to 350F.

Mix together the eggs, oil, and yogurt. In a separate bowl, mix the cornmeal, flour, salt, and lime zest. Add the dry to the wet, stir to combine. Grease a cake pan (I used an 8" diameter one), and pour the batter into the pan. Bake for 30-35 minutes.

Meanwhile, make the glaze. Mix ~1/4C of powdered sugar with the juice of one lime. It should be fairly runny, but add more juice or more sugar to get the texture you'd like.

When a tester comes out clean, remove the cake from the oven and dump out on a cooling rack, positioned over a plate. Maybe in a more graceful way than dumping. Poke a bunch of holes in the cake, and pour the glaze over the cake while its still warm, being sure to scoop up the glaze that ran off the cooling rack onto the plate back onto the top of the cake, especially into those holes you pokes.

Let the glaze and the cake cool for a bit before eating it. And then do your best to not eat it all at once...

Wednesday, May 19, 2010

Quail Egg Raviolo


Ed likes making pasta. I don't know why, sure its good but its not so much better than the stuff in a box that it makes it worth the time. Anyway, as long as he does all the rolling, I won't complain. We made some raviolos, the other day, apparently those are just very large ravioli. Ed wanted to put a quail egg inside the raviolo, and while that was weird, it was strangely delicious, too. Because the pasta is fresh, it cooks really quickly, in about 3 minutes, which is how long the quail egg takes to cook the whites and warm up the yolks. Then, when you cut into the raviolo, the slightly-cooked yolk oozes around and it tastes delicious. Sort of like self-contained spaghetti carbonara.
I don't have a recipe. It involved eggs, flour, and salt, and then I think just a lot of kneading and rolling.

The filling was quite good even without the pasta - ricotta, cooked oyster mushrooms, garlic, and ramps, and some salt and pepper. And of course, a quail egg. We used the filling to make sort of a circle to contain the egg, then used some of the egg white to seal the other piece of dough on top.


Sprinkled the end result with some olive oil so it wouldn't stick and some crumbled dry basil. And cheese. And salt and pepper. They were quite good, and if you'd used store-bought ravioli wrappers, would not have taken very long.

Thursday, May 13, 2010

Oven Polenta

The first time I tried polenta, it had been fried into strips, and it was crunchy on the outside and creamy on the inside, and quite delicious. We do most of our polenta like that, usually baked into whatever form you want it in, but generally not the goopy kind of polenta that you'd get in a restaurant if you ordered something with polenta. Ed likes polenta that is crunchy, but has yet to try the goopy sort, which I was guessing I'd like, given my morning oatmeal routine. In Anna's cookbook, the one that suggested the bean gratin, there was also a recipe for oven polenta. I should mention that I don't particularly like standing over the stove for 40 minutes stirring a pot of bubbling cornmeal, so the idea of being able to plop something in the oven and walk away for 40 minutes, well that sounded right up my alley.

The one problem was that I didn't agree with the measurements in the book, just like with the beans. The recipe called for 3-3/4C water to 1C of polenta, bring to a boil, plop in the oven for 40min, take out, stir, put back in for 10min. Maybe my oven just runs too hot, but after 40min, that puppy was DONE. Any longer and we would have needed a knife and fork to cut through it, instead of just a fork. Definitely not gloopy. So, if you want gloopy (I suppose I could call it creamy, or some other appetizing word like that, instead of gloopy) polenta, take it out after 30 minutes. Or turn down the oven even more.

A truly appetizing photo of yellow gloopy goodness.

Oven polenta
Made ~3 servings

1C coarsely-ground cornmeal (or polenta, which is the same thing, but twice the price)
3-3/4C water
1 tsp kosher salt
~1/4C grated parmesan cheese
Red pepper flakes for sprinkling on top when you serve it
A saucepan you can put in the oven. Alternatively, use two pots - one that you can put in the oven, and one that you can put on the stove.

Preheat your oven to 350F.
Put all the ingredients except cheese in a pot. Bring it to a boil, stir, then put the pot in the oven, uncovered. Set a timer for 30 minutes and walk away.

After 30 minutes, check on your polenta. Take it out and stir it, and if it is as gloopy as you like it, call it done, or if you like it stiffer, return it to the oven for another 10 minutes. Once you like the consistency of it (and it will harden up a bit once its no longer on the heat), take it out of the oven and stir in the cheese. Serve immediately.

Alternatively, press it into a flat layer on a sheet pan, let it cool, then cut it into shapes of your liking, spritz with oil, and bake again, to get crunchy polenta shapes.

The gloopy polenta passed the Ed-test, and it was easy enough that I'll probably do it again. Tasted good, too.

Wednesday, May 12, 2010

Jan Hagel cookies


I probably spelled that wrong, but its from Anna's Betty Crocker cookie cookbook. They are delicious, although Ed was being grouchy and didn't like them because they're not "cookie shaped". Fine, more for me. We changed the recipe a bit in that we only had pecans, not walnuts, to put on top, but that didn't change the deliciousness. Anna also had some Fiori Di Sicilia flavoring, basically a citrus/vanilla flavor, that made them very good. If you don't have any of that, I'd suggest adding some vanilla and some lemon zest or something, because they were delicious.

1C butter
1C sugar
1 egg, divided
1 tbs water
2C flour
1 tsp salt
1 tsp cinnamon
1/4tsp Fiori Di Sicilia
~1/2C walnuts or pecans (we needed more than 1/2C), finely chopped

Preheat your oven to 350F.

Cream the butter with the sugar, add the egg yolk and Fiori Di Sicilia or vanilla and lemon. Add the flour and salt on top, mix the salt into the flour, and combine flour with butter stuff. Grease a 9x15" pan (I think? Can't remember...), and press the cookie dough into the pan. Sprinkle with the cinnamon, and then brush with the egg white-water mixture. Sprinkle the nuts on top. Bake for 20 minutes, or until the edges are lightly browned. Cut into bar shapes immediately, and cool on a cooling rack.

Monday, May 10, 2010

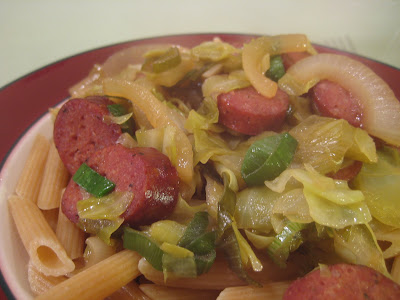
Cabbage and sausage pasta


I don't know why we had cabbage, but we did, and cabbage comes in large pieces, so we had leftover cabbage. Not really sure what to do with it, we turned to what we know best - glop over pasta! We also had some kielbasa, which made for a really nice beer-braised sausage and cabbage dish, over some whole wheat pasta, which supported those flavors really well.

Slice up an onion, chop up the cabbage, and heat some oil in a frying pan. Add the onion, stir until it softens. Add the cabbage, stir around for a while, then add ~12oz beer. Add the sausage, sliced up, and let that simmer away until the cabbage is soft and most of the beer is gone. Serve over pasta.

Friday, May 7, 2010

NYT No-knead bread


This no-knead bread was all the rage a while ago, and I'd made it once and it was good. So, I made it again. Its pretty easy, because you don't have to do anything except mix things together and let it sit, but you need the dutch oven to cook it in - I suppose a casserole dish with a heavy lid would work too, but the dutch oven was pretty great.

The original recipe is from the NYT, and its worth trying if you like bread that is chewy on the inside, crunchy and crusty on the outside, and has big holes in it. I'm all about the big holes. But that's hard to do with regular bread, for whatever reason, getting those big holes seems to take lots of experimenting and different attempts and tiny things make big differences - well, this one was easy.

Mix together 1/4tsp active yeast (I didn't have instant) with 1-5/8C warm water and 1 tsp sugar. Let the yeast get started, it won't do much since its a tiny amount of it, and then add 3C of flour with 1-1/4tsp salt. Mix that all together and then just leave it in its mixing bowl for 12-18 hours, covered with plastic wrap.


After about 12 hours, it'll look like this - big holes on the top. Supposedly that means that its ready.


Flour your hands, and then in the bowl, knead the dough a couple times until its all deflated. No need to overdo it. Replace the plastic wrap and let it sit for another 1.5 hours.
(after knocking it down, before the second rise).

In the last half hour that its rising, preheat the oven to 450F, and put the dutch oven into the oven to warm up with the oven. The dough should have about doubled in bulk by this point, and once your oven is preheated, transfer the dough carefully to the hot dutch oven. I put down some cornmeal first, so it wouldn't stick. Put the dutch oven back into the oven, with the lid, for 30 minutes. After 30min, take off the lid, and cook for another 15min, to get that golden crust. Take it out, turn it onto a cooling rack, and cool enough so that it doesn't burn you when you dig into it.

The holes!

Thursday, May 6, 2010

Bean Gratin

Anna has a cookbook, and I've already forgotten its name, that I was browsing through the other day as we were waiting for cookies to bake. Anna has many cookbooks, but this one happened to be out and was interesting, and I was in the legume section, and saw something for "Bean Gratin". Intrigued, I read the recipe, and it sounded like an interesting way to prepare beans. Basically, you take cooked beans and bake them in a sauce until the sauce reduces more, and then add cheese on top and bake some more until it melts. Although I have some issues with the measurements (when do I not have issues with measurements?), it came out quite nicely, and passed the Ed-test.

The original recipe called for 6 cups of cooked beans, and I wasn't sure how many dry beans would make 6C of cooked beans, so I looked in my pantry and chose the fullest jar of beans that I had, which happened to be about 1-1/4C of white beans. The recipe then called for 1-1/3C rich broth, i.e. a broth that had been reduced a bit on the stovetop. We had some extremely rich beef stock from the oxtails, that was already pretty reduced, so I went with that. Since I ended up with about 2C of cooked beans, I thought I should use 2/3C of broth, but that didn't quite cover them (I also didn't have the 2-quart casserole dish called for - I don't know how big a 2-quart casserole dish is, but since I don't have any casserole dishes, I just went with a pyrex pan. Which was too big, apparently). So, I added about 1/3C water, which at least moistened them.

The rest of the recipe worked great, except that the beans on top dried out (duh. they're being baked, and aren't covered in liquid), but that was ok, because the dried out beans tasted delicious and a bit crunchy. So, although I'm sure the original recipe was delicious, this version is worth making again, too.

Bean Gratin
1-1/4C dry beans (or 2.5C cooked or canned - if canned, rinse them first)
1 bay leaf
1 tbs bacon fat or other fat
~2tbs salt

1C tasty broth or stock
1/2C grated parmesan cheese

If you have dry beans, you'll have to start this early - soak the beans for 6-8 hours, until they've about doubled in size. Then simmer them with a bay leaf and the bacon fat for about 20 min, until they're soft enough to eat. Add the salt, and simmer some more, another 10min or so. Beans other than small white beans will take different amounts of time to cook, just FYI.

Preheat your oven to 375F.

Once your beans are cooked, pour them into a pyrex baking dish - mine is big. I don't know the dimensions. If I weren't lazy, I'd go look it up. But the size doesn't really matter - the wider it is, the more dry and crispy your beans will get, the smaller the surface area, the more creamy your beans will be. I think the goal is for creaminess.

Pour the broth over the beans. Bake for 35 minutes. Take them out at 35min and add the cheese on top. Put them back in the oven for 10 minutes, until all the cheese is melted. If you want it a little browned, you could broil them for a minute or two.

Serve!

This was how much liquid there was - definitely not covering the beans. I might try it in a less shallow dish next time, if I could find such a thing... maybe a pyrex mixing bowl. Does that even work?

They exploded. But that tasted good, so it was just fine.

Added the cheese, and it comes out all glued together and delicious and cheesy and creamy with occasional chewiness/crunchiness. Pretty good.

Tuesday, May 4, 2010

Mushroom-ramp risotto


Ed went and bought $8 worth of ramps. Ramps are a spring veggie, also known as wild leeks, and I guess they can only be gotten in the spring, hence the price tag. But, Ed likes them, and I guess $8 isn't much to him. It also buys a LOT of ramps, so we ended up making a huge batch of risotto, which we couldn't really finish all at once. I think you're not supposed to make risotto in such large quantities, something about the texture, but that's never bothered us. We also had about 6 cups of chopped maitake and shitake mushrooms for the risotto. Straight-up deliciousness!

Mushroom-Ramp Risotto
Makes ~5 servings

1C short-grained white rice
1C white wine
4C chicken or beef broth (beef broth will turn your rice brown-ish)
1/2lb (~6C chopped) ramps
4C chopped mushrooms, you choose the kind
1/4C grated parmesan cheese
Olive oil

Heat the wine and the chicken broth. Put some olive oil (~1tbs?) into a wok or other large frying pan. Once the oil shimmers, add the rice, and stir that around in there for about two minutes. Then add the warm wine. Once the rice has absorbed all the liquid, add ~1/2C of the broth, and keep stirring and adding more liquid until the rice has about quadrupled in size. At some point in there, add the mushrooms and some salt, as the mushrooms will give up their water too. Taste the rice occasionally, and when it tastes done, stir in the ramps, cook for about a minute, and pull from the heat. Stir in the cheese, and serve.

Our rice is all brown colored because we used beef broth instead of chicken - we'd been cooking oxtails with this, and used some of the rich sauce they were braising in for the risotto - it was delicious, but turned things brown. I'll take that sacrifice for that taste.

Monday, May 3, 2010

Roasted garlic


I've had roasted garlic, spread on toasted bread, done on the grill before. But this time Ed did it in the oven (due to our overwhelming lack of grill in these parts), and it was awesome. Apparently its a little tricky figuring out where to cut the garlic, because you want to get the top off of each clove so you can get it out, but you don't want to cut away too much of the garlic - this stuff is good!

Roasted garlic
1 large head of garlic
olive oil
coarse-grained salt
bread (preferably french bread or some other rustic-style loaf)

Preheat your oven to 350F.

Keeping the head of garlic whole, chop the top off of it, trying to get a clean cut through the top of each clove while not removing too much of any clove. Put this on a sheetpan, cut side up, and drizzle generously with olive oil. More oil means more even cooking, or something like that. Put the garlic in the oven, and cook until its done. We weren't timing this, so really, you just keep cooking it until the cloves are soft and the whole thing has a slightly brown mostly golden toasted look. It should also smell delicious. I want to say it took 20-30 minutes, but just keep checking it every 10 minutes.

Meanwhile, cut the bread into slices, and toast that until its crispy on the outside and still chewy on the inside. If you drizzle or spray it with olive oil first, it'll toast up faster. This took ~5 minutes in the oven.


Pop out a clove of garlic using a butterknife - they should come out very easily, and should be quite mushy at this point.

You should be able to spread the garlic quite easily on the bread. Spread it around - if you want to split each clove over two pieces of bread, I won't be insulted, we like our garlic around here, so were laying it on thick. Hey, as long as the person you're kissing is also eating garlic, its all good...

For true deliciousness, sprinkle on some coarse-grained salt once you've spread the garlic - kosher salt or sea salt.

Maybe we shouldn't have eaten the entire head ourselves, but it was delicious - we couldn't help ourselves.

Sunday, May 2, 2010

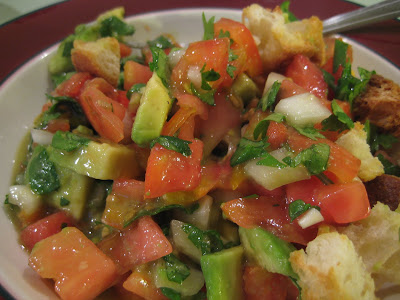
Tomato-avocado salad


I was having trouble getting inspired by anything at the store when I went to get stuff for dinner the other day, so I came home with some heirloom tomatoes and avocados. I didn't have a plan for them, but they turned into a salad. It was delicious.

2 avocados
2 heirloom tomatoes
~1/4C chopped cilantro
juice of a lime
bulb of 1 spring onion
salt to taste
Croutons (just chop up some stale bread and toast it)

Mix everything together and eat...